# GCP GCS
This guide explains how to connect GCP Cloud Storage to the Weekerp API.
It includes the full process of creating credentials and registering them in Weekerp.
#### Required information for connection
To allow Weekerp to access your images, you need to provide the following:
* service account key (JSON)
* Client email
* Project Id
* private key
* bucket name
#### Getting credentials (GCP)
If you’re not familiar with GCP, we recommend creating a new **read-only Service Account** so Weekerp can read images from your bucket.
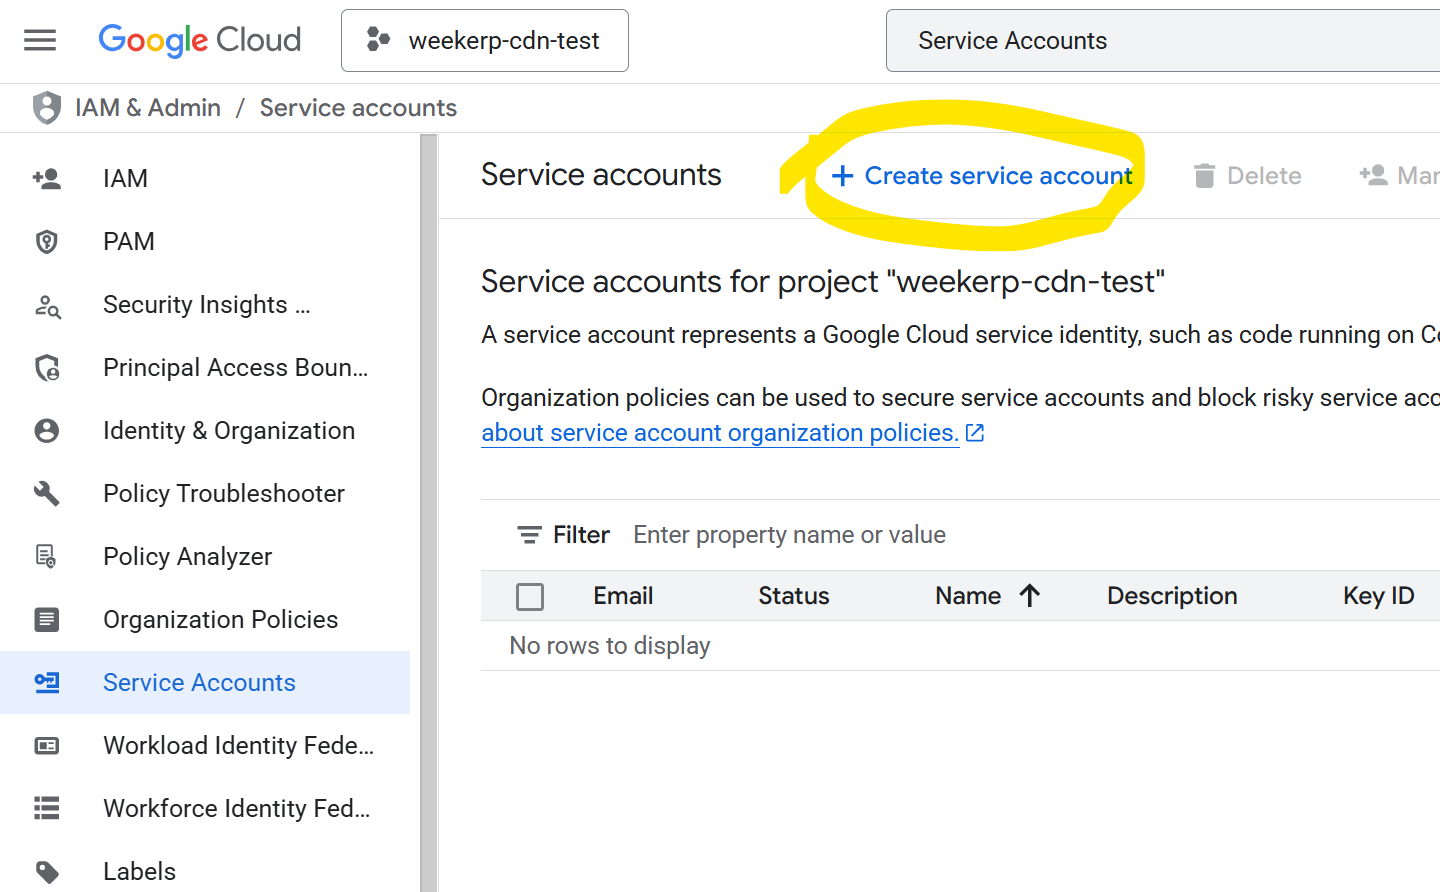
1. Open the GCP Console → **Service Accounts** → **Create service account**
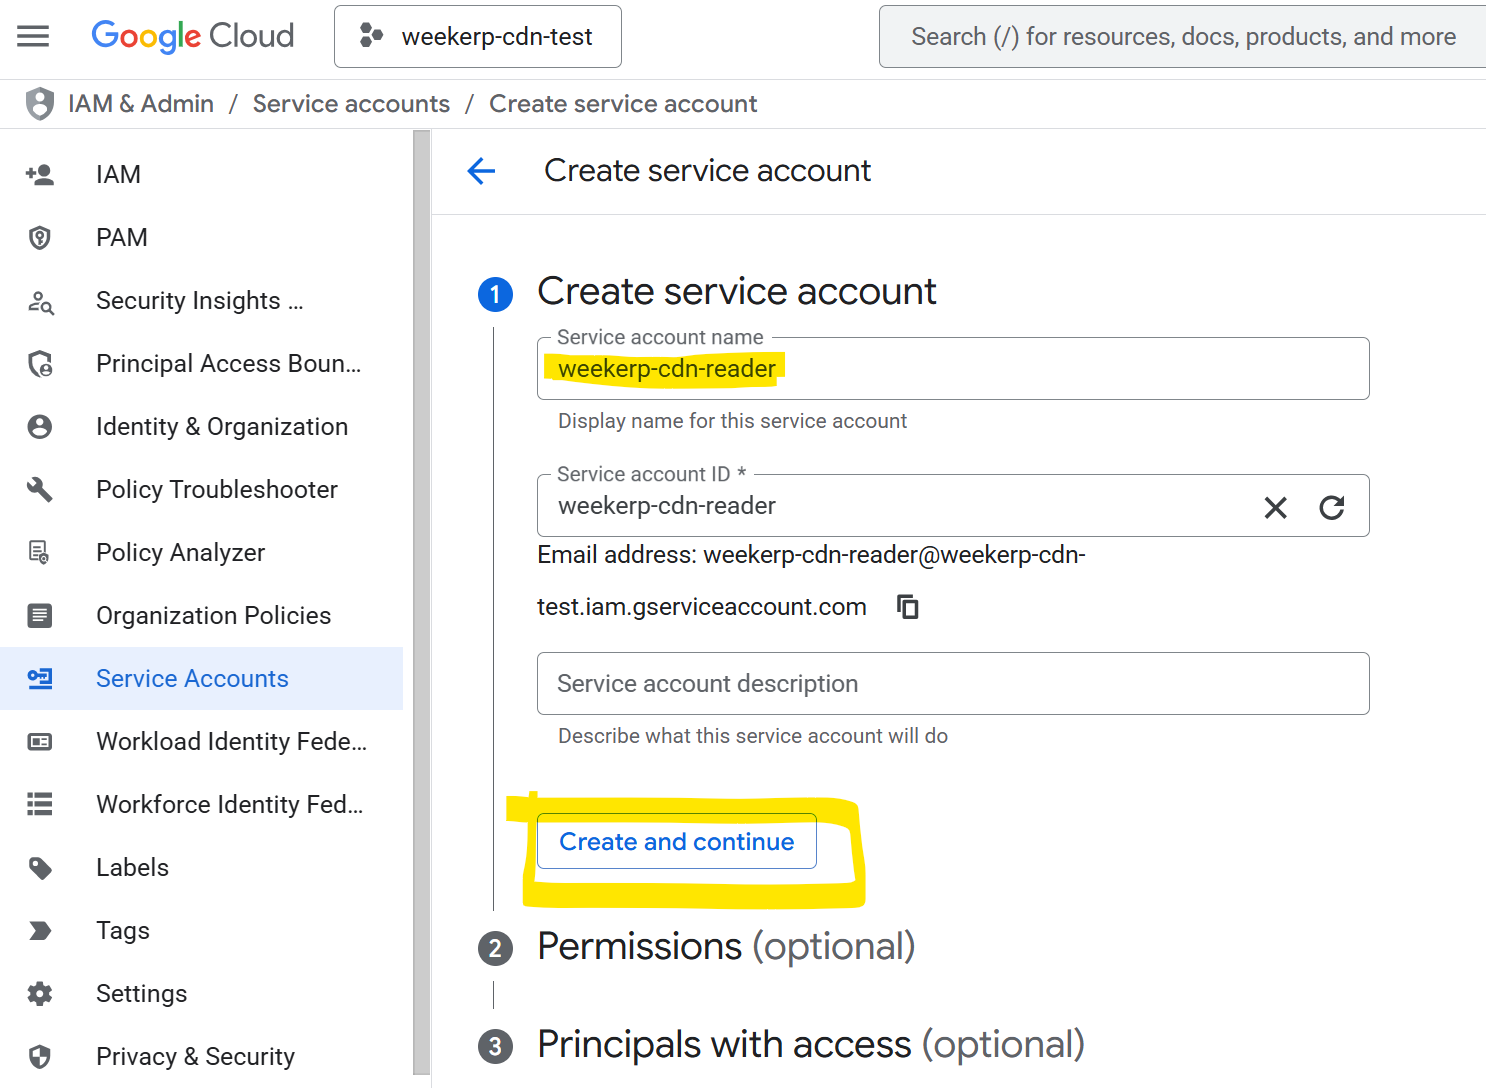
2. Enter a Service Account name (e.g., `weekerp-cdn-reader`) → **Create and Continue**
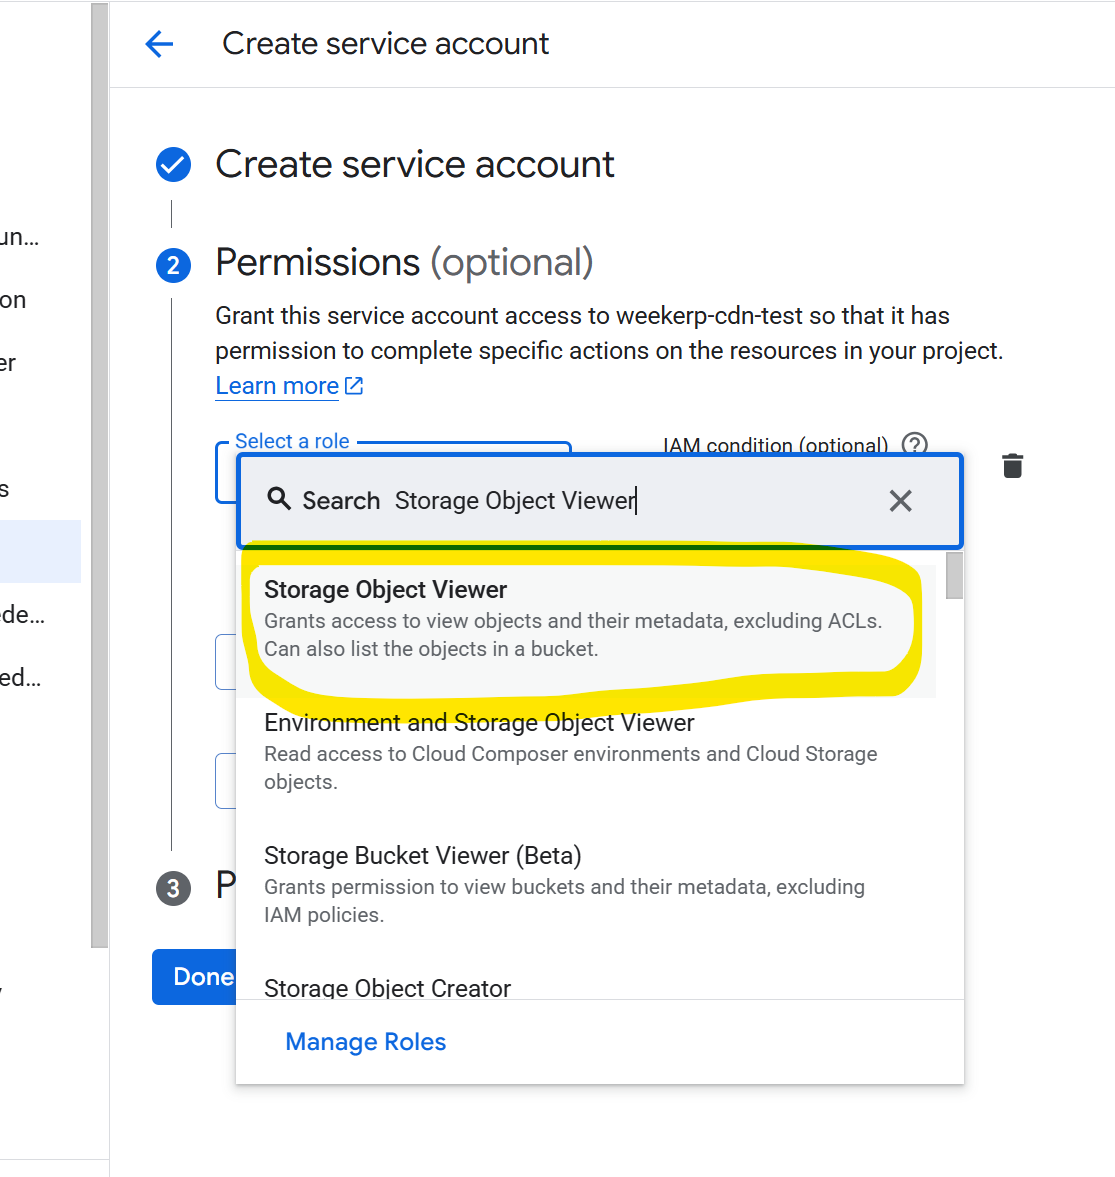
3. Set the role → search/select **Storage Object Viewer** → **Done**
4. Select the created Service Account → **Keys** tab → **Add Key** → **Create new key** → **JSON** → **Create**
5. Save the downloaded JSON key file (**do not share externally**).
6. In the GCP Console → **Buckets**, confirm the **Bucket name** to connect.
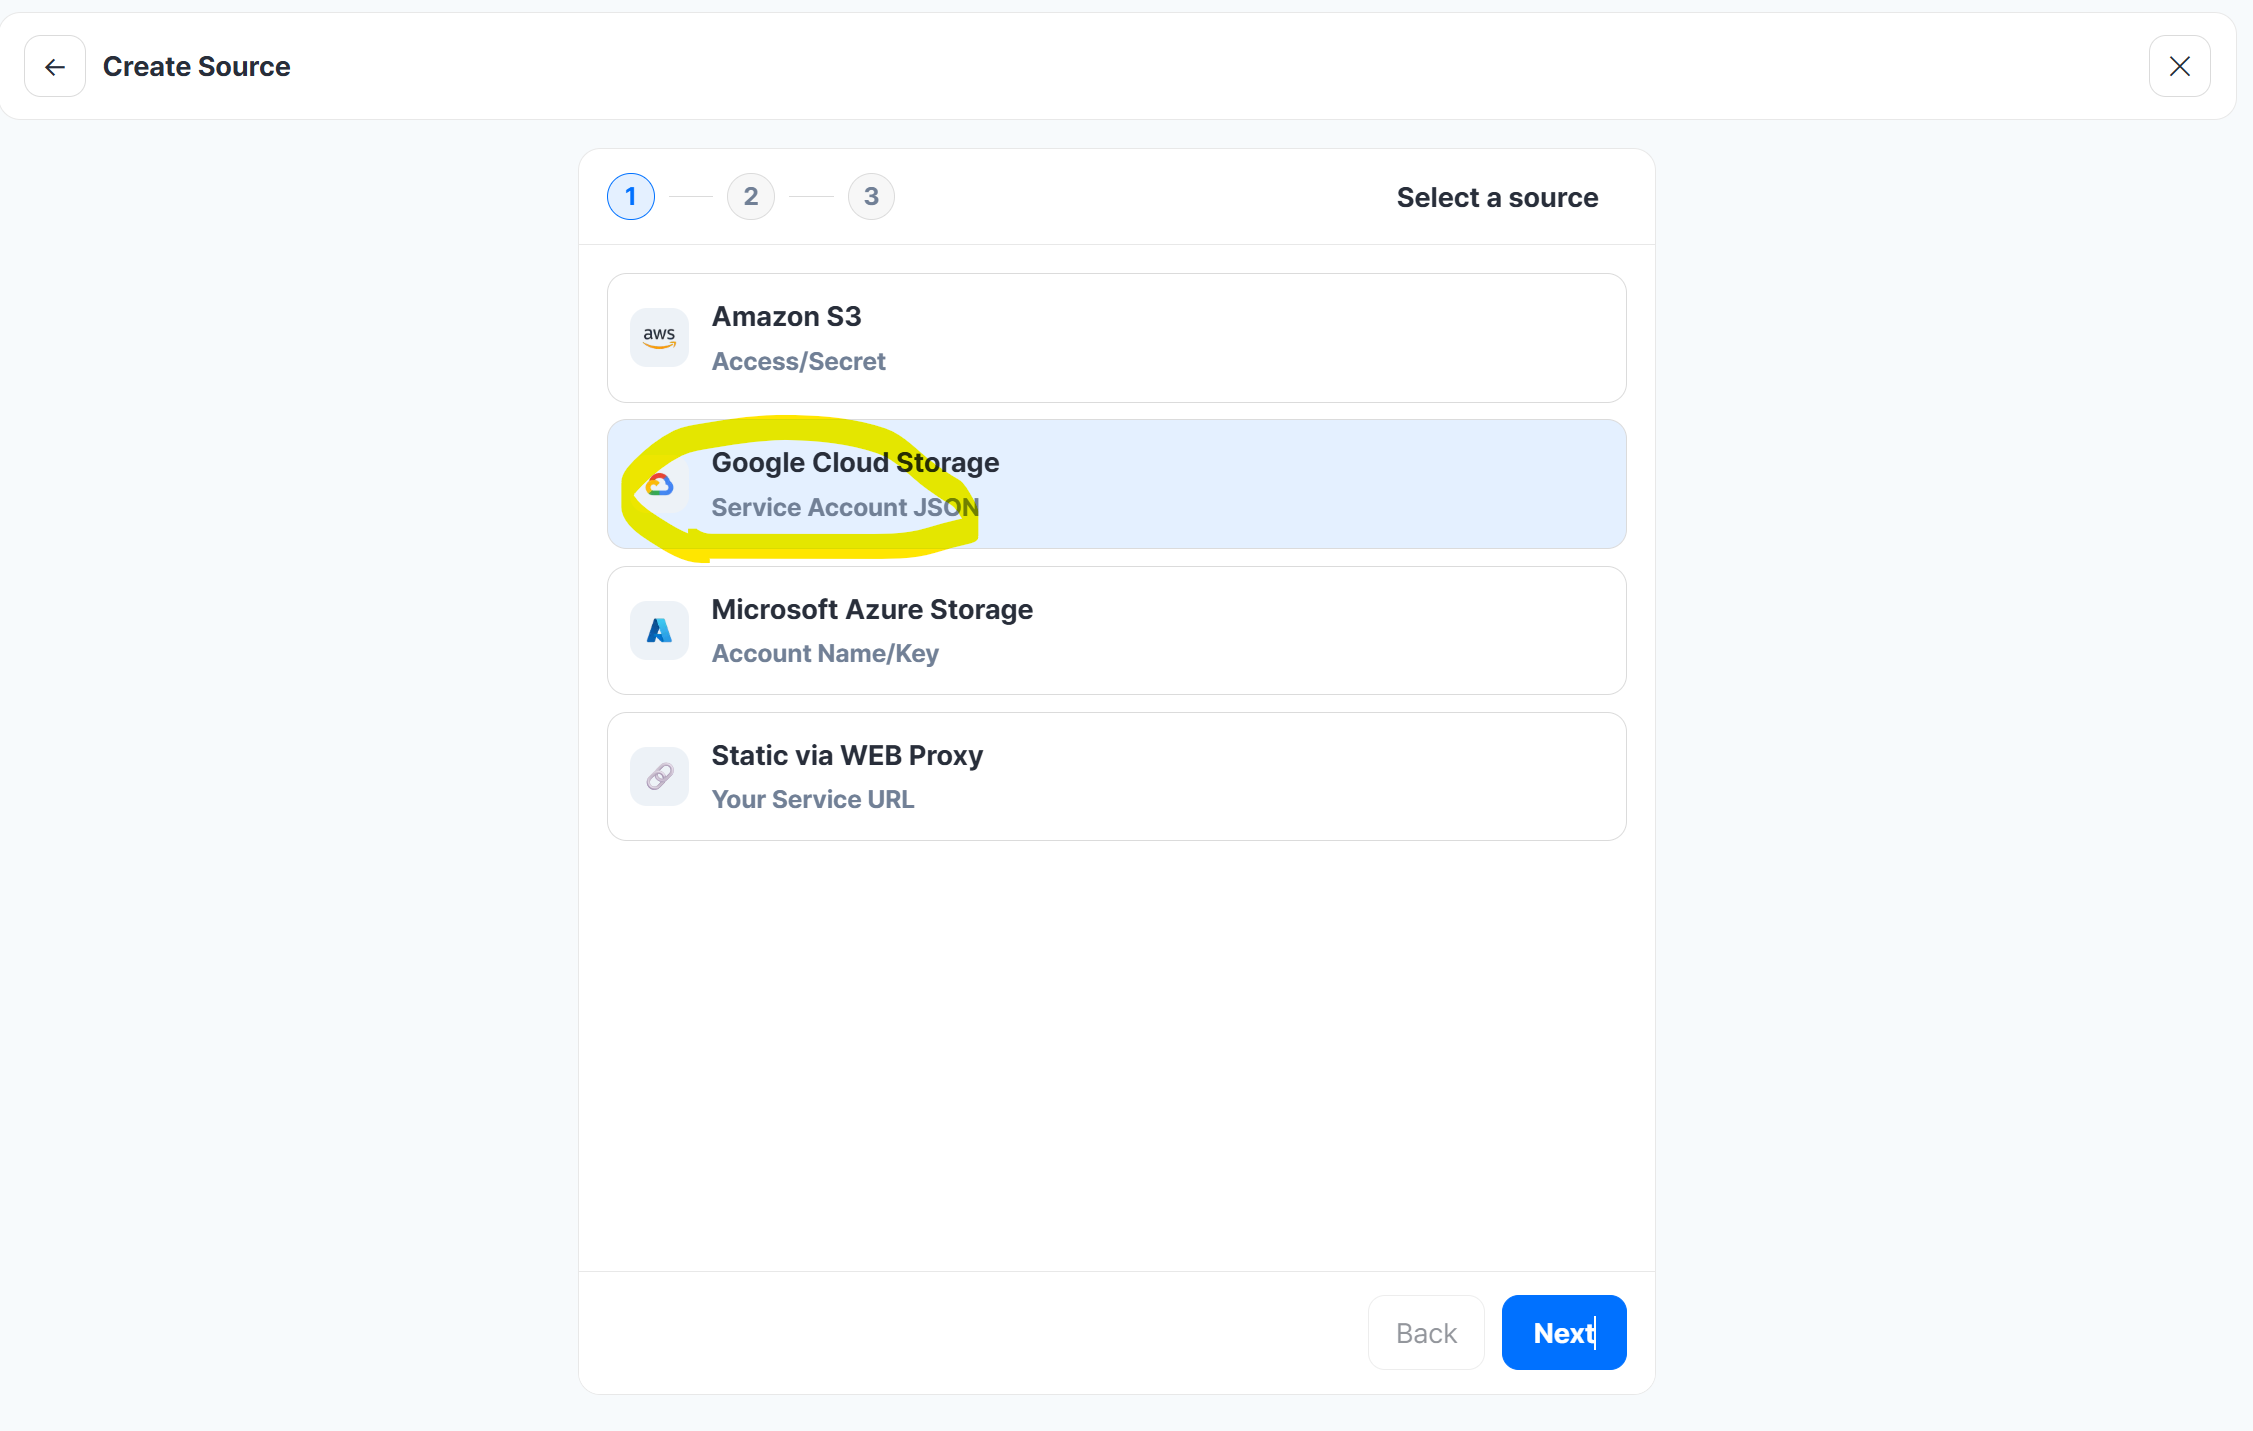
7. In Weekerp → **Sources** → **Add Source** → **Google Cloud Storage (GCS)**
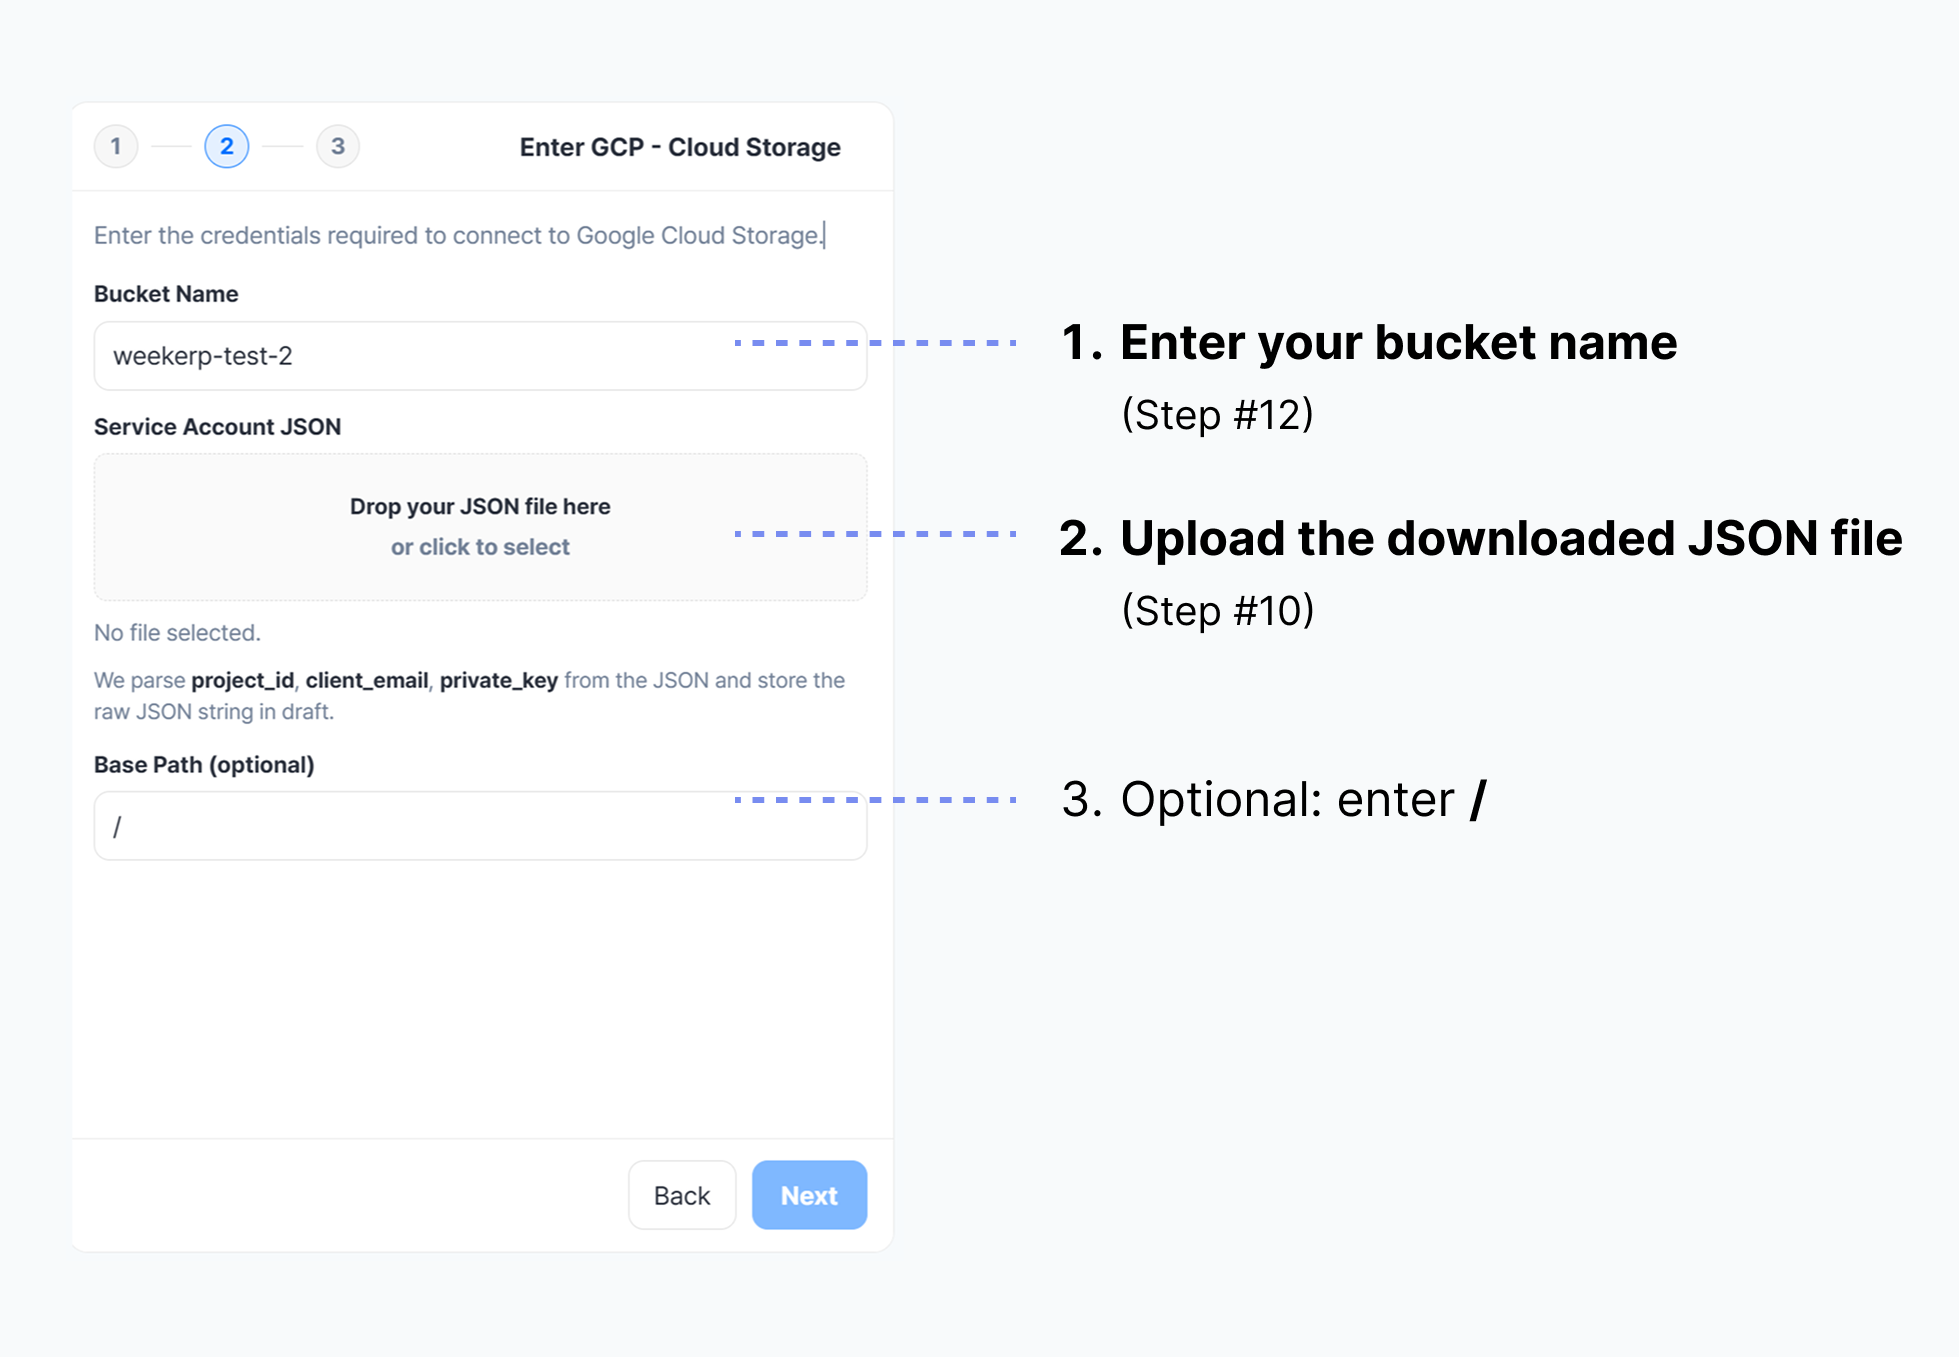
8. Enter the **Bucket name** + upload the **JSON key file** → **Next**
9. Enter an **Alias** and create it to add the source.
#### Below is the same guide shown in images.
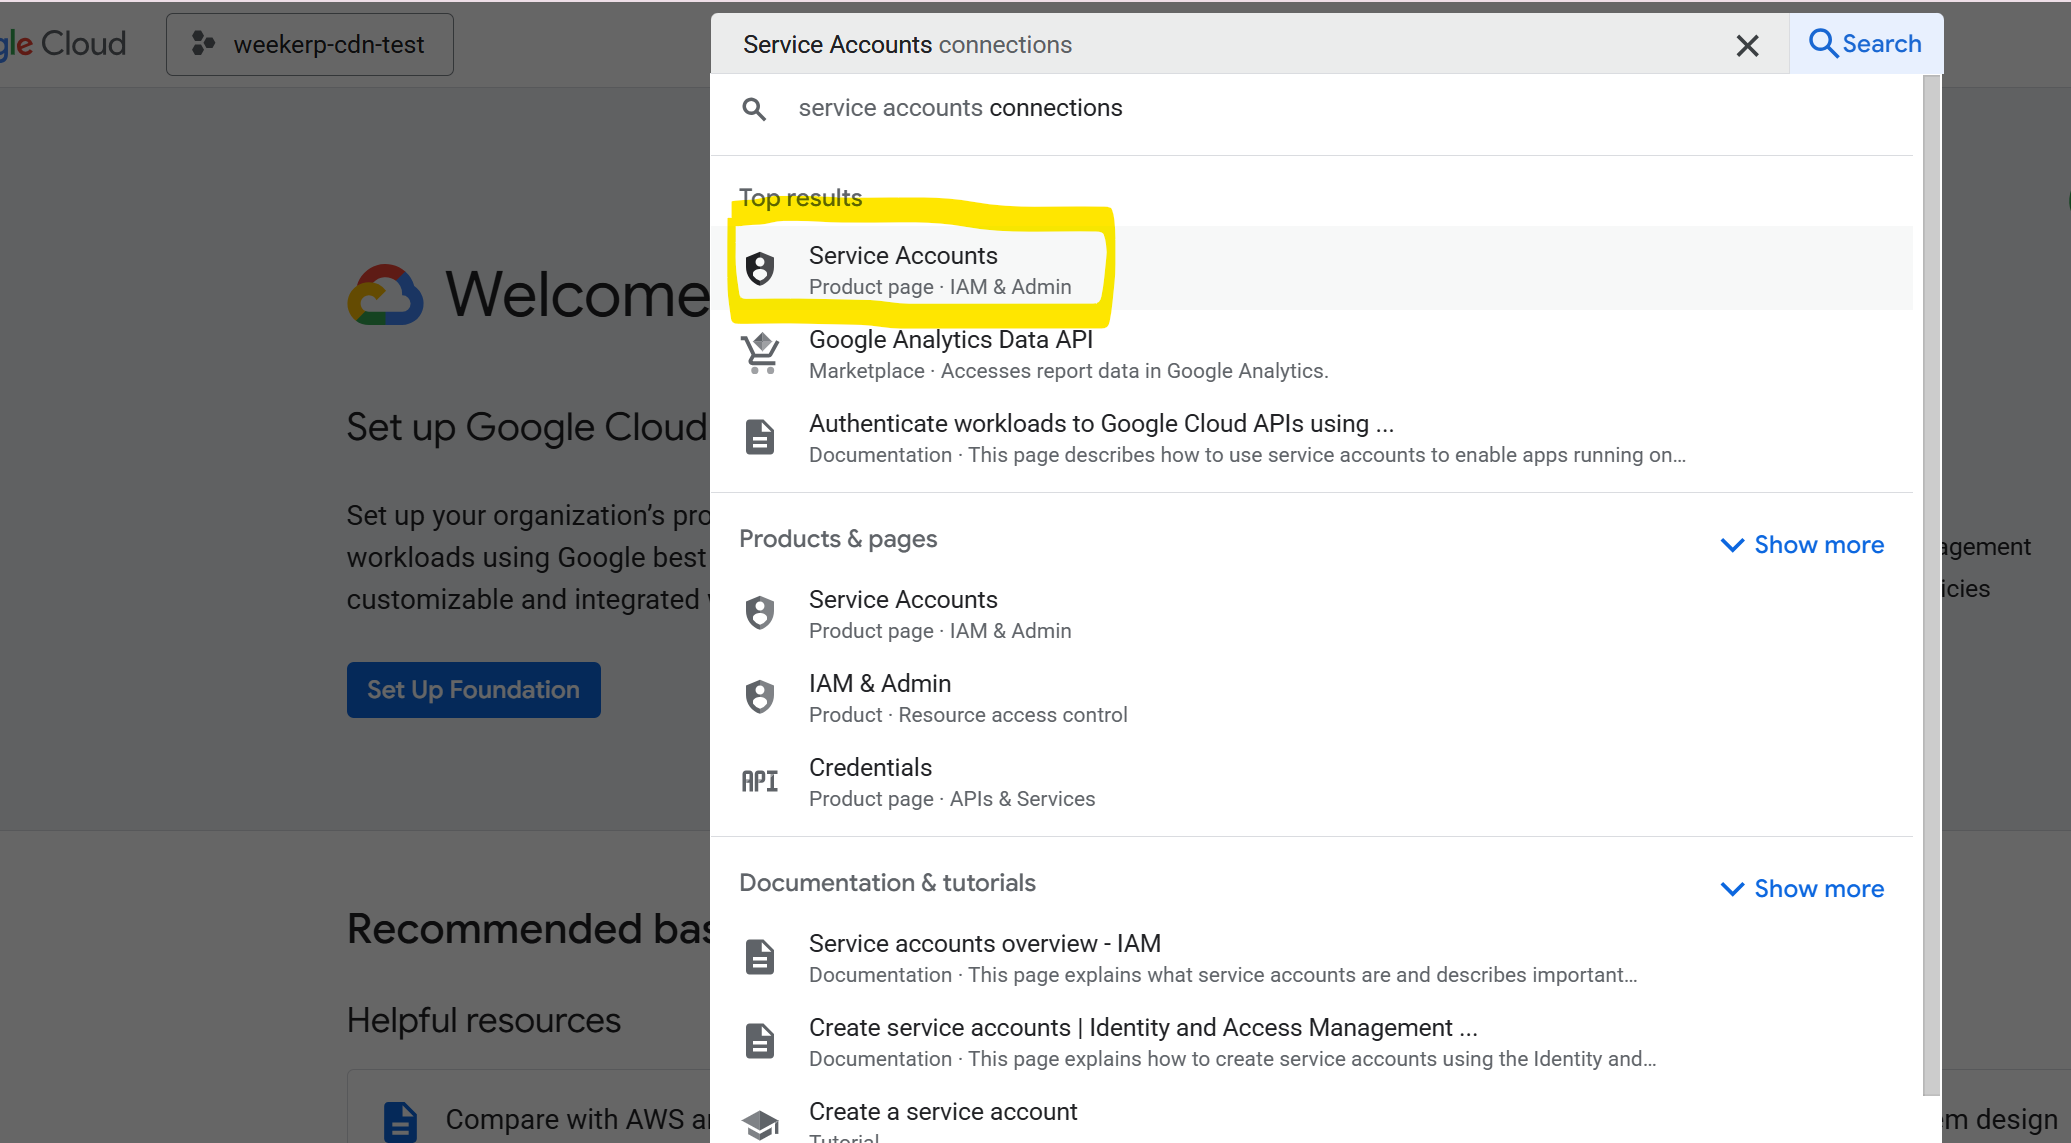
#### 1. Search for **“Service Accounts”** in the GCP Console
#### 2. Click **“Create service account”**
#### 3. Create a Service Account
1. Enter `weekerp-cdn-reader` (you can change this)
2. Click **Create and Continue**
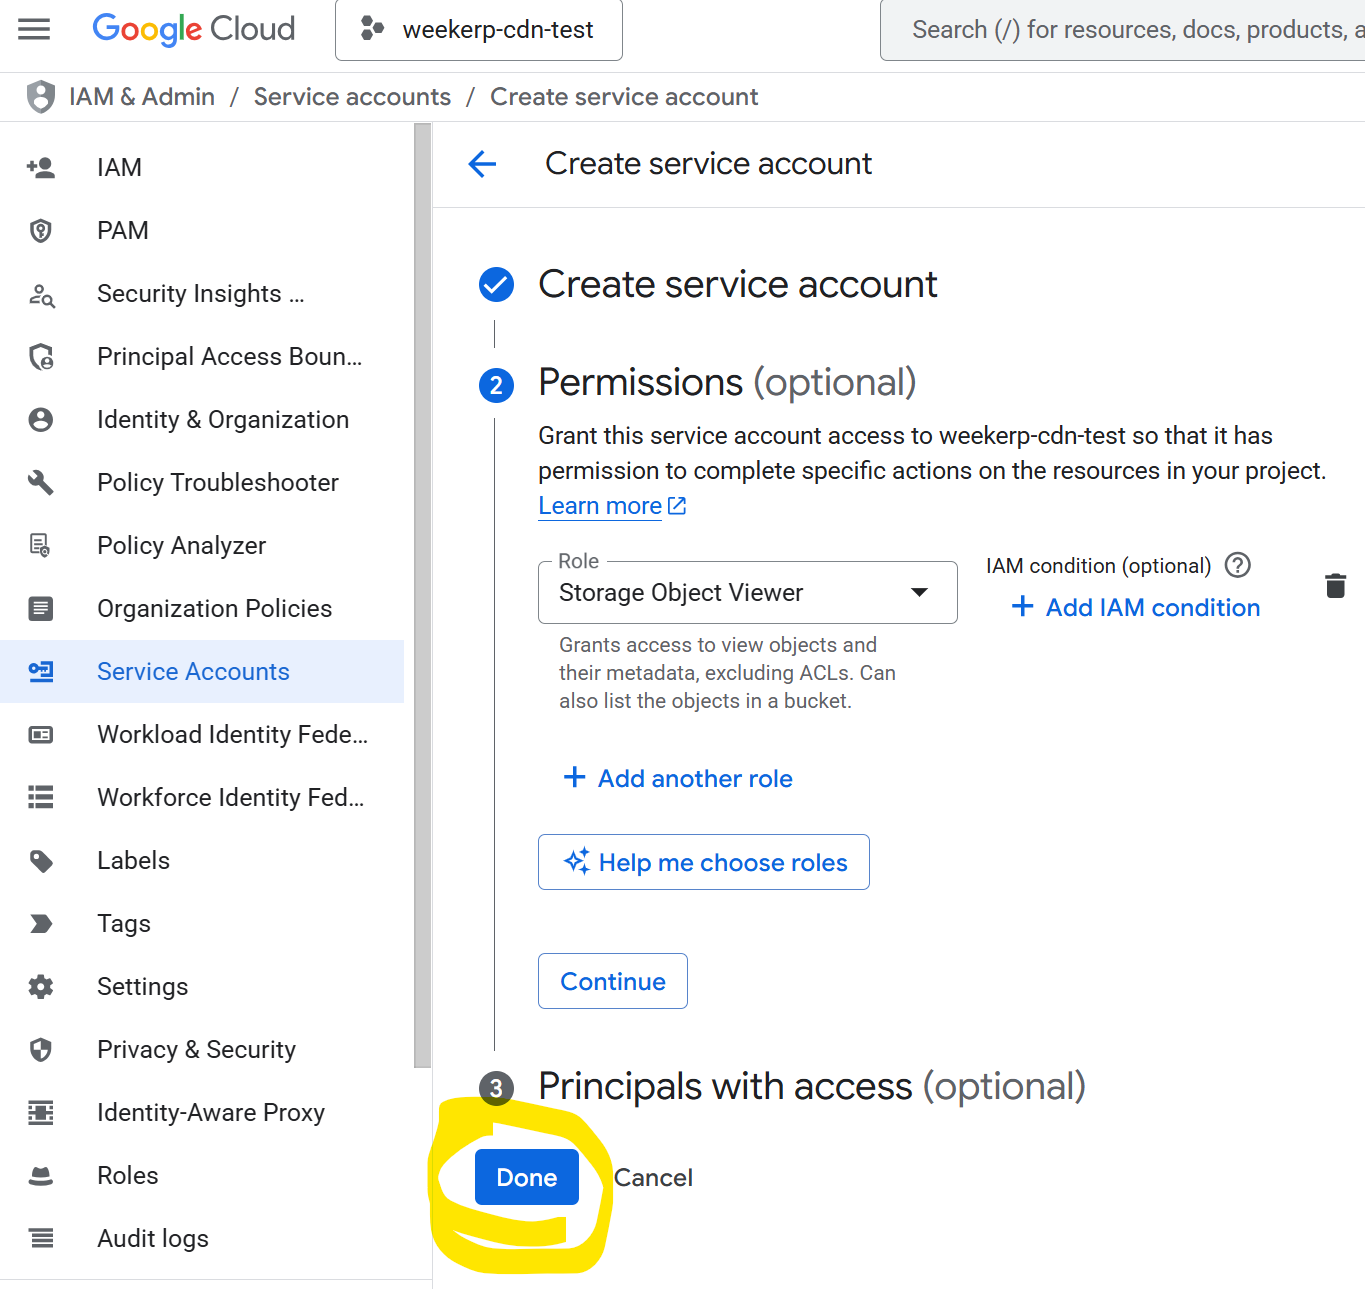
#### 4. Grant permissions to the account, and open the **Role** dropdown
#### 5. Search and assign **Storage Object Viewer**
1. Search for **Storage Object Viewer**
2. Click **Storage Object Viewer** at the top of the results
#### 6. Finish granting permissions
1. Click **Done**
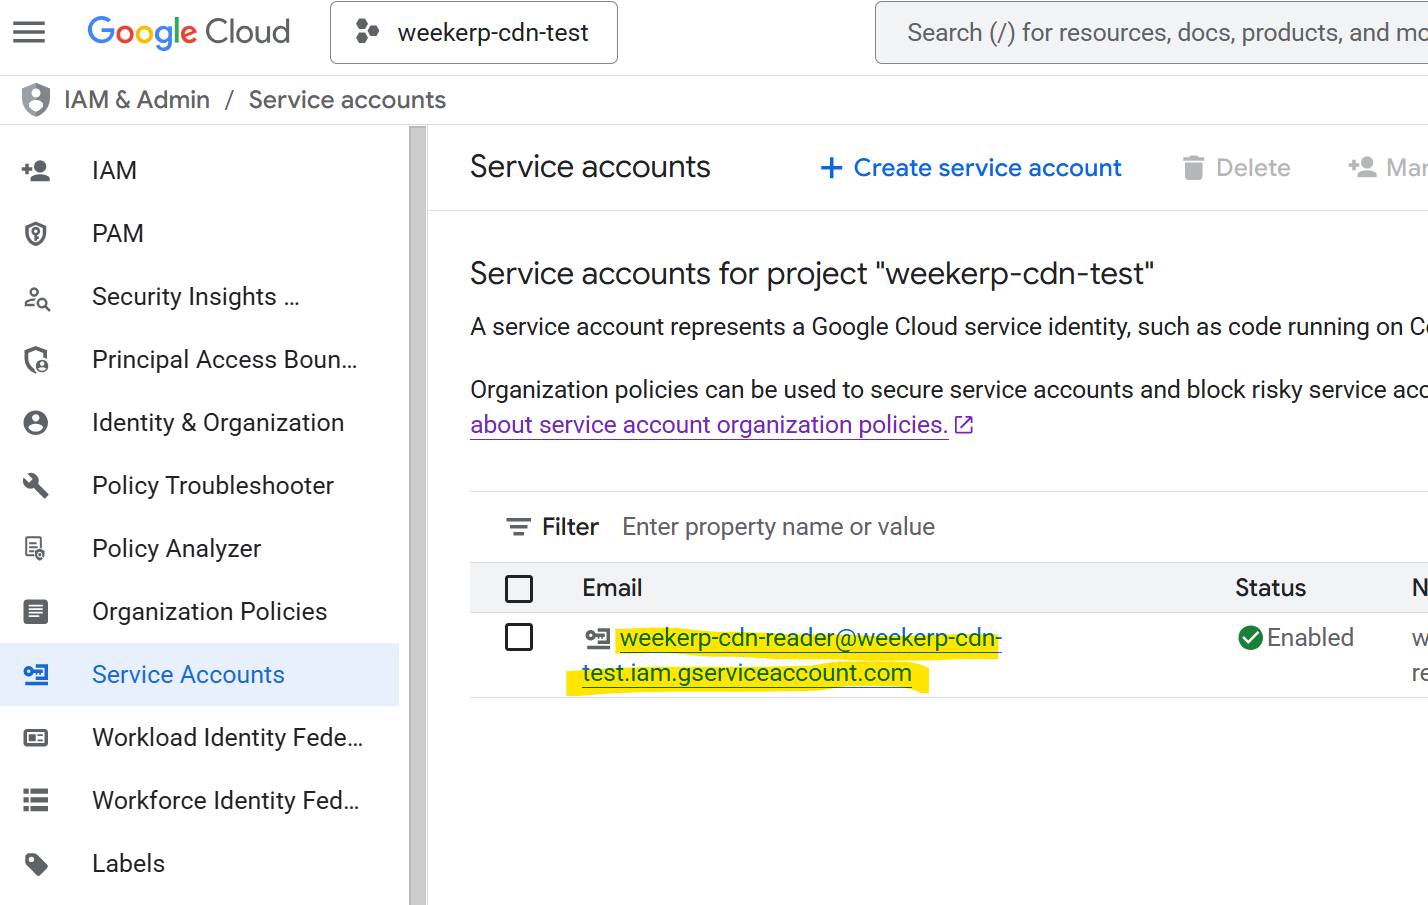
#### 7. Verify the created account and open its details
1. Confirm the created account
2. Click the account name
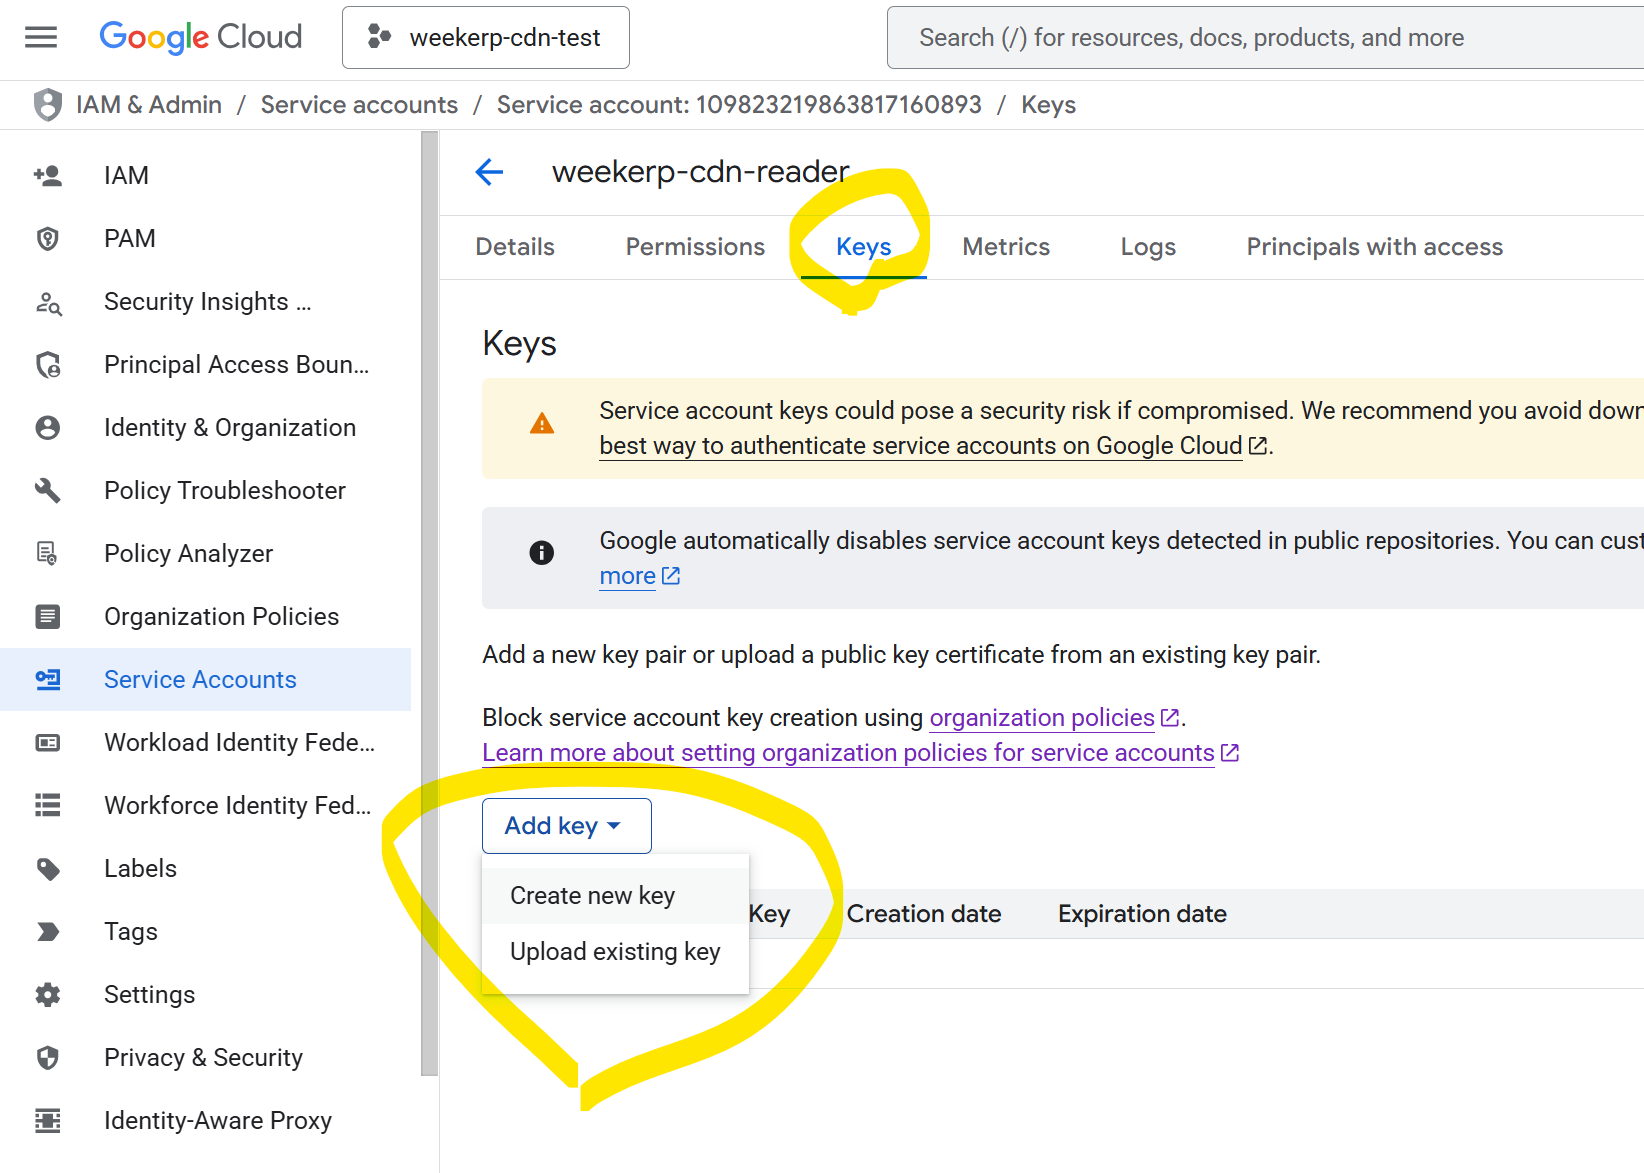
#### 8. Create a key (JSON)
1. Click the **Keys** tab
2. Click **Add Key**
3. From the dropdown, click **“Create new key”**
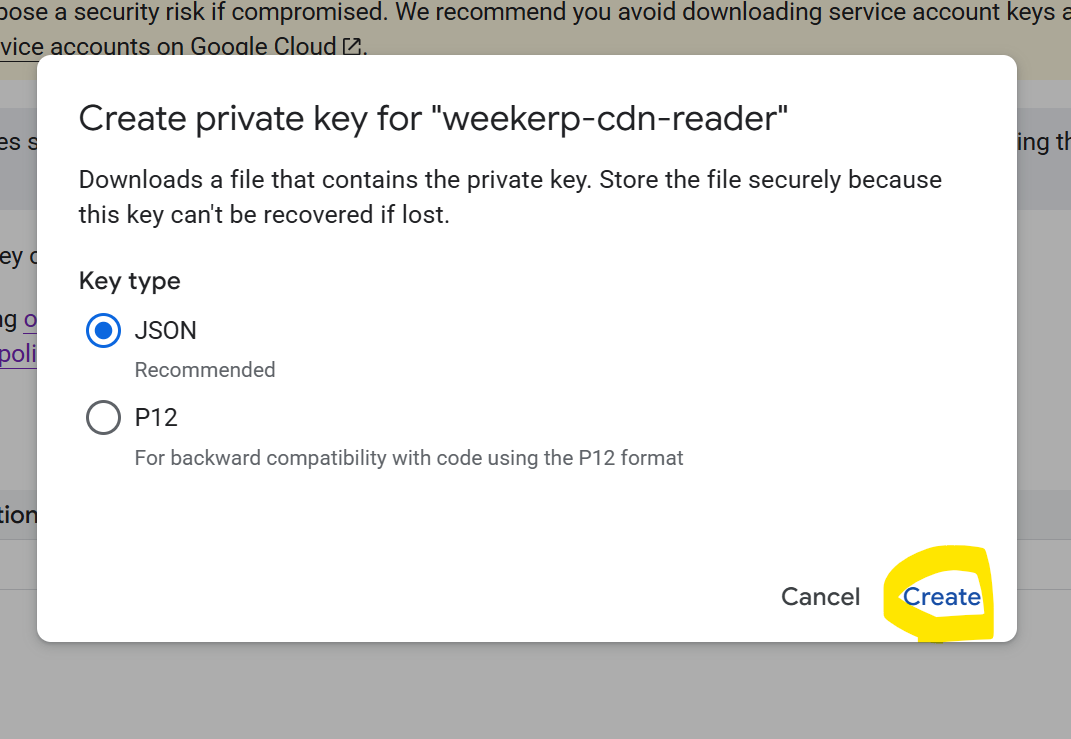
#### 9. Select the key type
1. Choose **JSON**
2. Click **Create** (bottom-right)
#### 10. Verify the downloaded key file (`.json`)
After downloading the JSON file, you’ll receive a key like the following (**do not share externally**).
```json
{
"type": "service_account",
"project_id": "weekerp-cdn-test",
"private_key_id": "4e393a5fe31bfa11fecb5eae0d47d4603fe681d5",
"private_key": "-----BEGIN PRIVATE KEY-----\\nMIIEvgIBADANBgkqhkiG9w0BAQEFAASCBKgwggSkAgEAAoIBAQCWuvmrL083KrOK\\nJW/IH/GX3rBmOjfWneJb4jFCQadoQFChtTW9TUJCwtFpSGOSJ6wmIJSNG2QJWuIn\\nnTKeAKnAGQsFA2ezlSkfjUZ2mOx+6CZidZhIQIsTvVqjp2LJf+SM+oeRFwVEIgiJ\\n4bzjtxra1HAeAjR9AeSxQBvJDc2SXBXpUznDS8nD3Z/52M4A66+WAAOwqCWPey4l\\n17ahHE6vN9BBAi5puTBa1Q/YJt7O8ELH6KJA4MbYqenvJmTIQImQeDb+gcGzb1Ka\\n3hVyn4uU4G89mTMMtWPAINu9jU9Q2sX2xrFuzMDDRlpmABbVtH29sZzn2TpkvJdp\\nT/J+h6z3AgMBAAECggEAFc7TlKrxoR+yfkhQVfoZMEnt57yAm7KYL4cYbWemWvUD\\nNYJMVik5bwNU3RC2J01KIPIRzCCsZpYZpnWd/zJFXR/CcmU9ucPZAVGlYj9Z6Dqa\\nYyB0ee+sr5xz4r2zE0hHvwX4W0ujXWo3JgvdEm1Jm2OlHRJgmb2OYv7NhldS6Nvk\\n+4z5jrH+SYNyIRqOSh1y+tWNIjPLzRqt6lH1vP6f8lcTp7ESDYeN15JvB6QuStU1\\nKUDSMZpiq7G071nQrFNrXEKZhK9PWa1/7bnGLe+oIL3rjQUqdm7a9mFmRcdRAmVZ\\nQA2JWjleCMKRBiq1cEZTdCMgpm92lgWGBOLcIFEmEQKBgQDPJ9Twl7plkXuLrtvo\\nyFE4ycUfnGrB7Uki0ozcdkfOdJVr9v6DJvqTeWn1P8zgtO/MlHj0uuu4/4QiVd1d\\n2ldzwlN+AibXZdo6ZOqdDthSd7oWAaRB+Lp/WuL+yQSZ0zvr0B1AmNet+bW2Raer\\nqof86/9FAoUJHRl/1euBQ/XLqwKBgQC6RT9Lm+TYJEwO4N18SWdMnlF2au8X58ji\\nbDA653xoAybYvXC/+rkfQMUL9bvWR0PL0+p7Zw4nw8Eqi/tTHYiMA3CKWgSE3rQZ\\neT1Ja47nBxBPU83cn74pbKElYy9gZi0XBZgtggbHBqxmxBJXUz76PviSfpHGiqT7\\nG7YO+fR35QKBgQC7H//6VRTLKt+vDgUYAdtcsOaf52uIQhAOpKMZgr7af/V50WOW\\nlV9EWCieoUMwuEDlTDj22OKV+johye5tGQ5mQuOor8jmSdsXZJGJzh8aX4x41ILM\\nFSJiaHckL/E4Atfd6+CAuZAaV7cNL16Gc0Tj80pjzCLgWKjwEQzrd7hQgQKBgC8n\\nBGTRa9bDKXXCuo6RzlJ46Uo+u5OjmximJndizf1OfvDy063lfCNLNBZY+Fm/5Iue\\nc4cViWHLjgSFNvPNUBmRbVW4f9hav+CK7la9oYkeIqTSJBSrY2n9E7XxK7cNZnCj\\ne+hZN/n92HqTO8lbS1/xvN7op2JJCoZ+d1HHOHl5AoGBAMMinfkr73SU2kuOIzwI\\nBXtpY6s/O4CaCoFHM5sTkXzYs8++rtwMbMGfkRSxKTwW3Qi5Nl1+GIUP+Ke8y/kn\\n7XYb2WDTmJpKOyRcp8nwVtO2il6iPqZvyjI/5yj+MeZxuKPwE8v/PqThlUSFK6/x\\nKquzm/b2ZXFh52bmn1Po6tsb\\n-----END PRIVATE KEY-----\\n",
"client_email": "weekerp-cdn-reader@weekerp-cdn-test.iam.gserviceaccount.com",
"client_id": "109823219863817160893",
"auth_uri": "",
"token_uri": "",
"auth_provider_x509_cert_url": "",
"client_x509_cert_url": "",
"universe_domain": "googleapis.com"
}
```
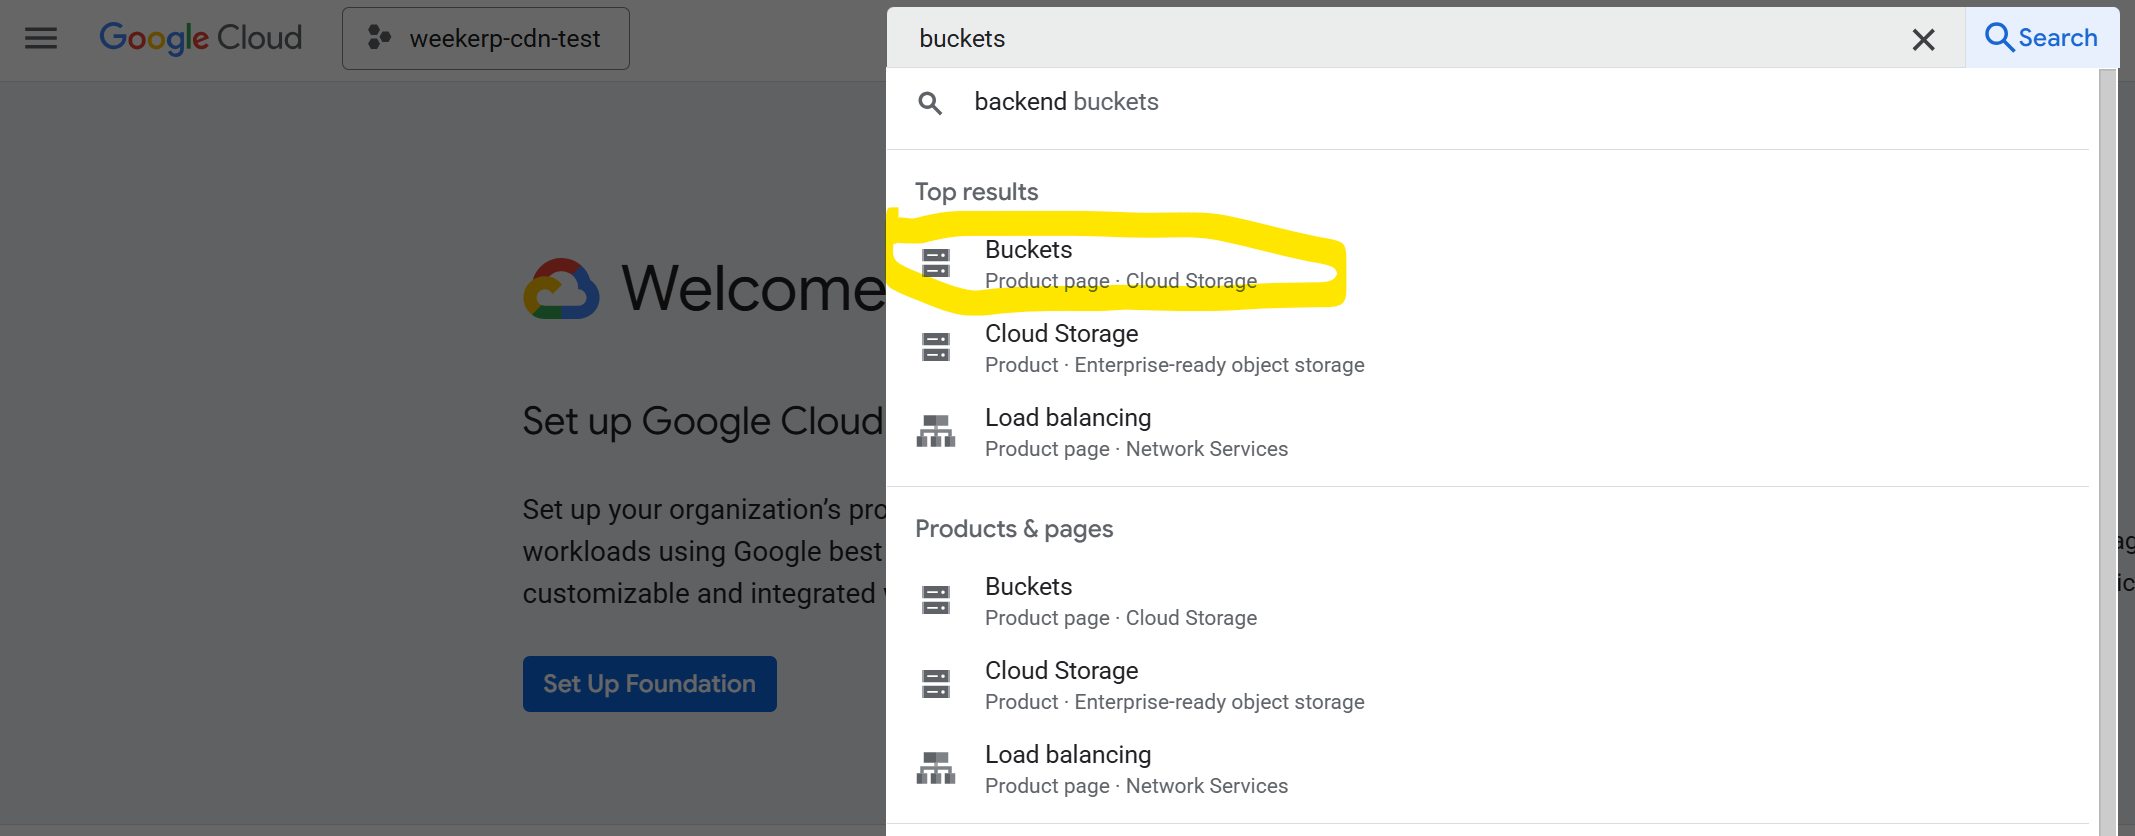
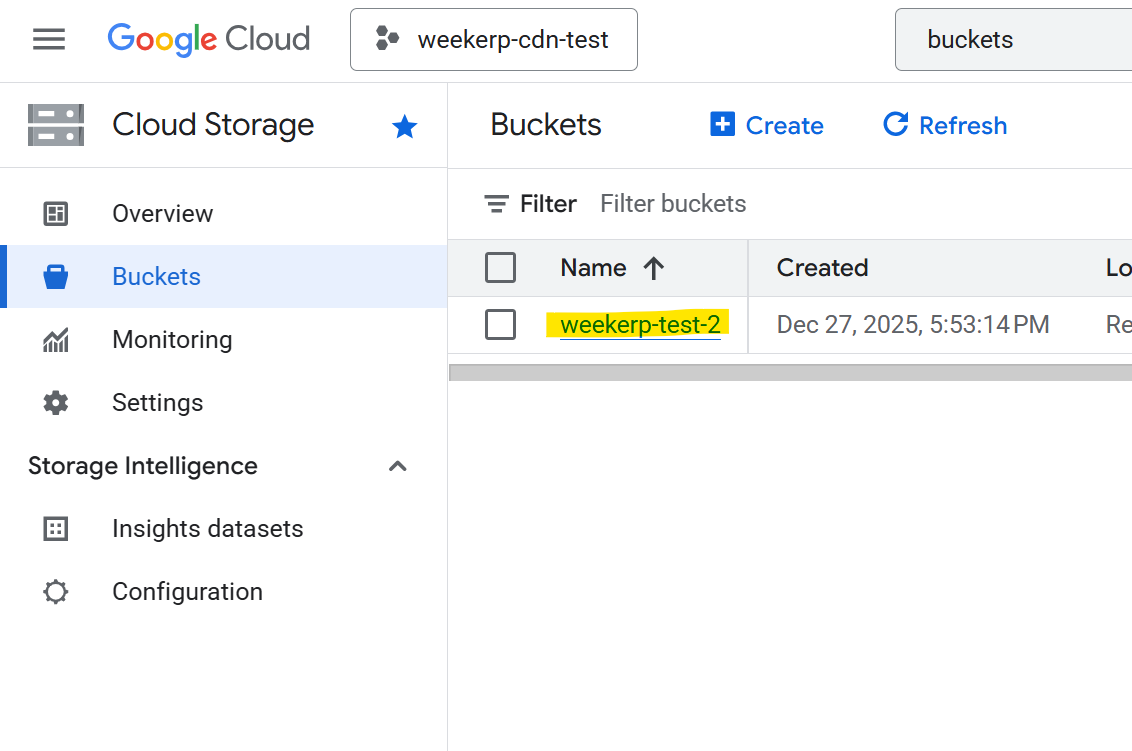
#### 11. Search for **Buckets** in the GCP Console (to confirm the bucket name)
#### 12. Confirm the **Bucket name**
1. Example: `weekerp-test-2`
#### 13. You should have the following information ready:
1. Credential JSON file (Step #10)
2. Bucket name (Step #12)
#### 14. In Weekerp, click **Add Source** (top-right)
1. Open Weekerp
2. Click the **Source** tab
3. Click **Add Source**

#### 15. Select **Google Cloud Storage**

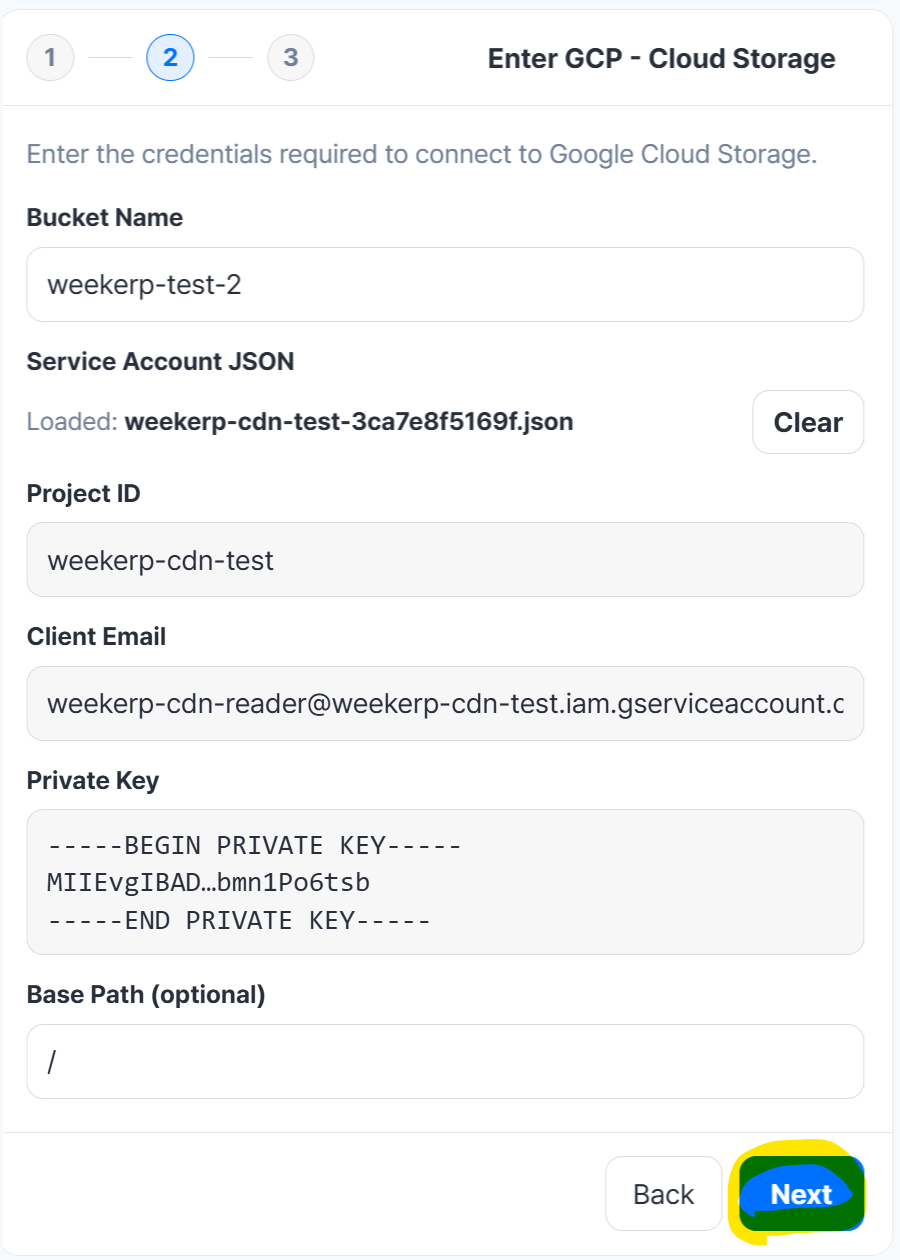
#### 16. Enter credential information
1. Enter the **Bucket name**
2. Upload the **JSON file**

{% hint style="info" %}
**BasePath** sets the root directory for origin requests.
{% endhint %}
If your files are stored like below, you can set BasePath to `/` or `/assets`.
* /dog.jpg
* /assets/cat.png
**Request example**
* `cdn.weekerp.com/image/{alias}/dog.jpg`
**Origin request**
* **With BasePath set:**
* **Without BasePath:**
For more details, please refer to [basepath](https://weekerp.gitbook.io/image/storage/basepath "mention").
#### 17. Review the entered information
1. Confirm the details
2. Click **Next**

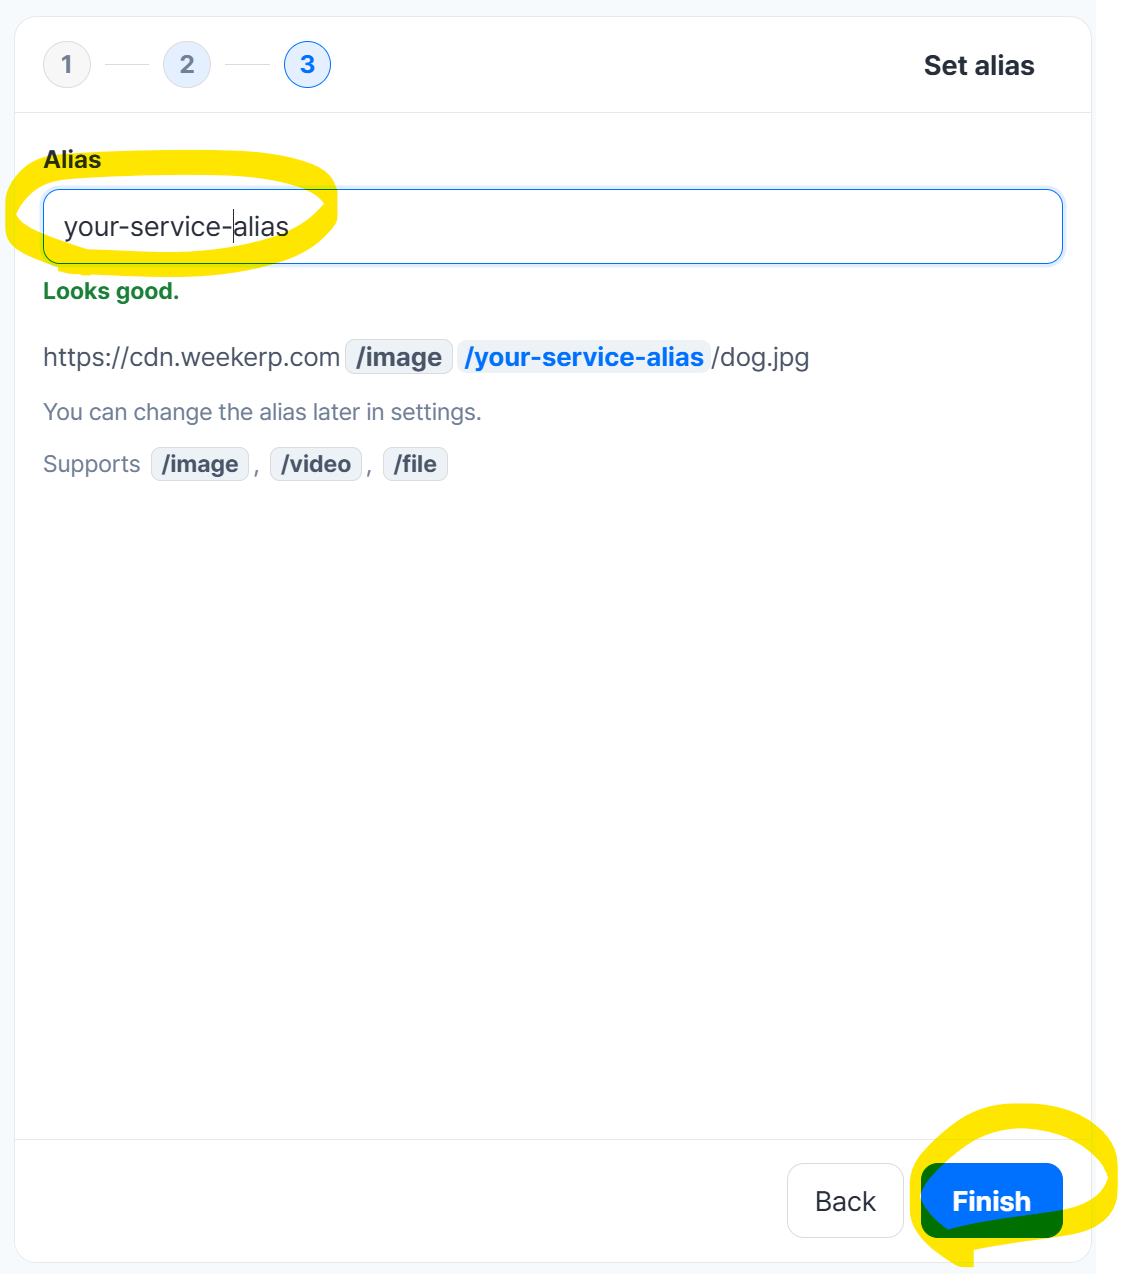
#### 18. Enter the source alias
1. Enter the alias you want to use
2. Create the alias

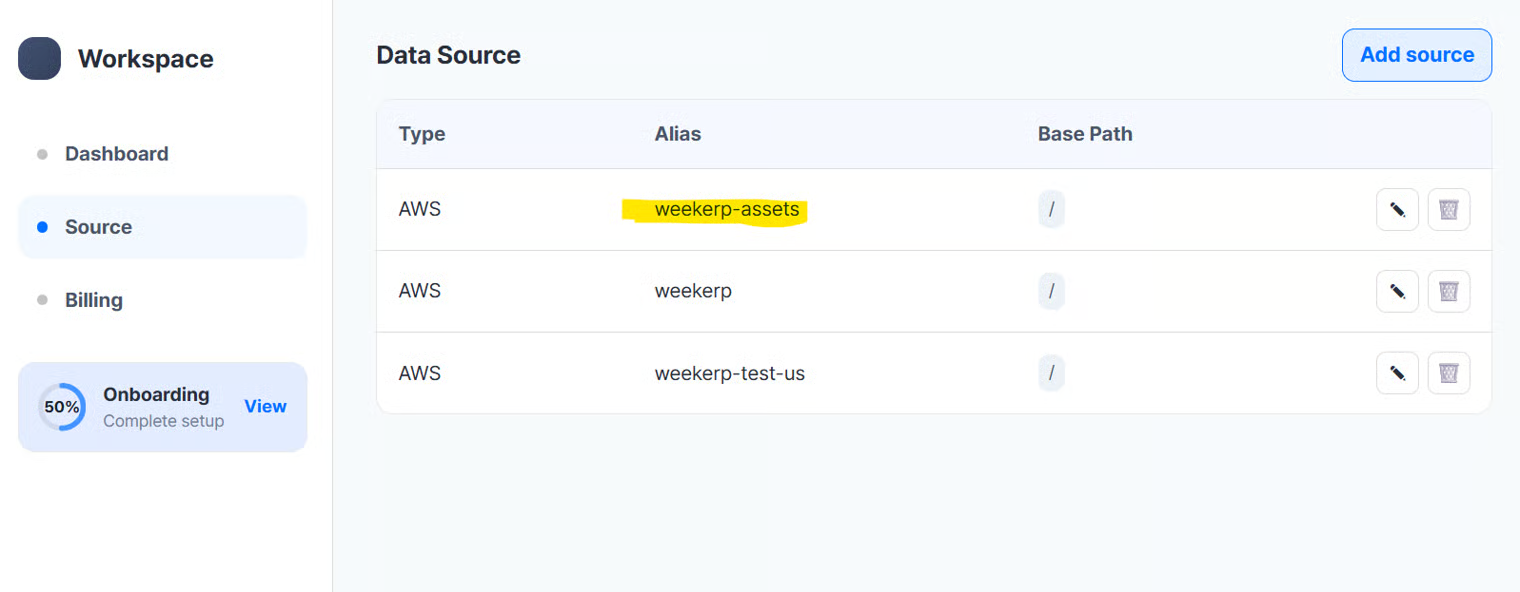
#### 19. Verify the created data source

#### Use it like this:
cdn.weekerp.com/`image`/`weekerp-assets`/dog.jpg
cdn.weekerp.com/`image`/`weekerp-assets`/dog.jpg?ai=Rotate the image to the right
cdn.weekerp.com/`video`/`weekerp-assets`/test-video.mp4
All settings are complete.
In general, it takes about **5–10 minutes** to propagate the connection across all global environments.