# AWS S3

This guide explains how to connect AWS S3 to use the Weekerp API.

It covers the full process of issuing credentials and registering them in Weekerp.

#### Required information for connecting

To allow Weekerp to access your images, you need to provide the following:

* Access Key ID
* Secret Access Key
* Bucket name

#### Getting credentials

If you’re not familiar with AWS, we recommend creating a dedicated IAM user so Weekerp can access your images.

1. Open the Amazon IAM (Identity and Access Management) console.
2. Go to **Users ⟶ Create user**.
3. Make sure to enable **Programmatic access**.
4. In the **Permissions** step, select **Attach existing policies directly**.
5. Search for and select the **AmazonS3ReadOnlyAccess** policy.
6. After completing the steps, you’ll receive an **Access Key** and **Secret Access Key**.
7. Then log in to Weekerp.
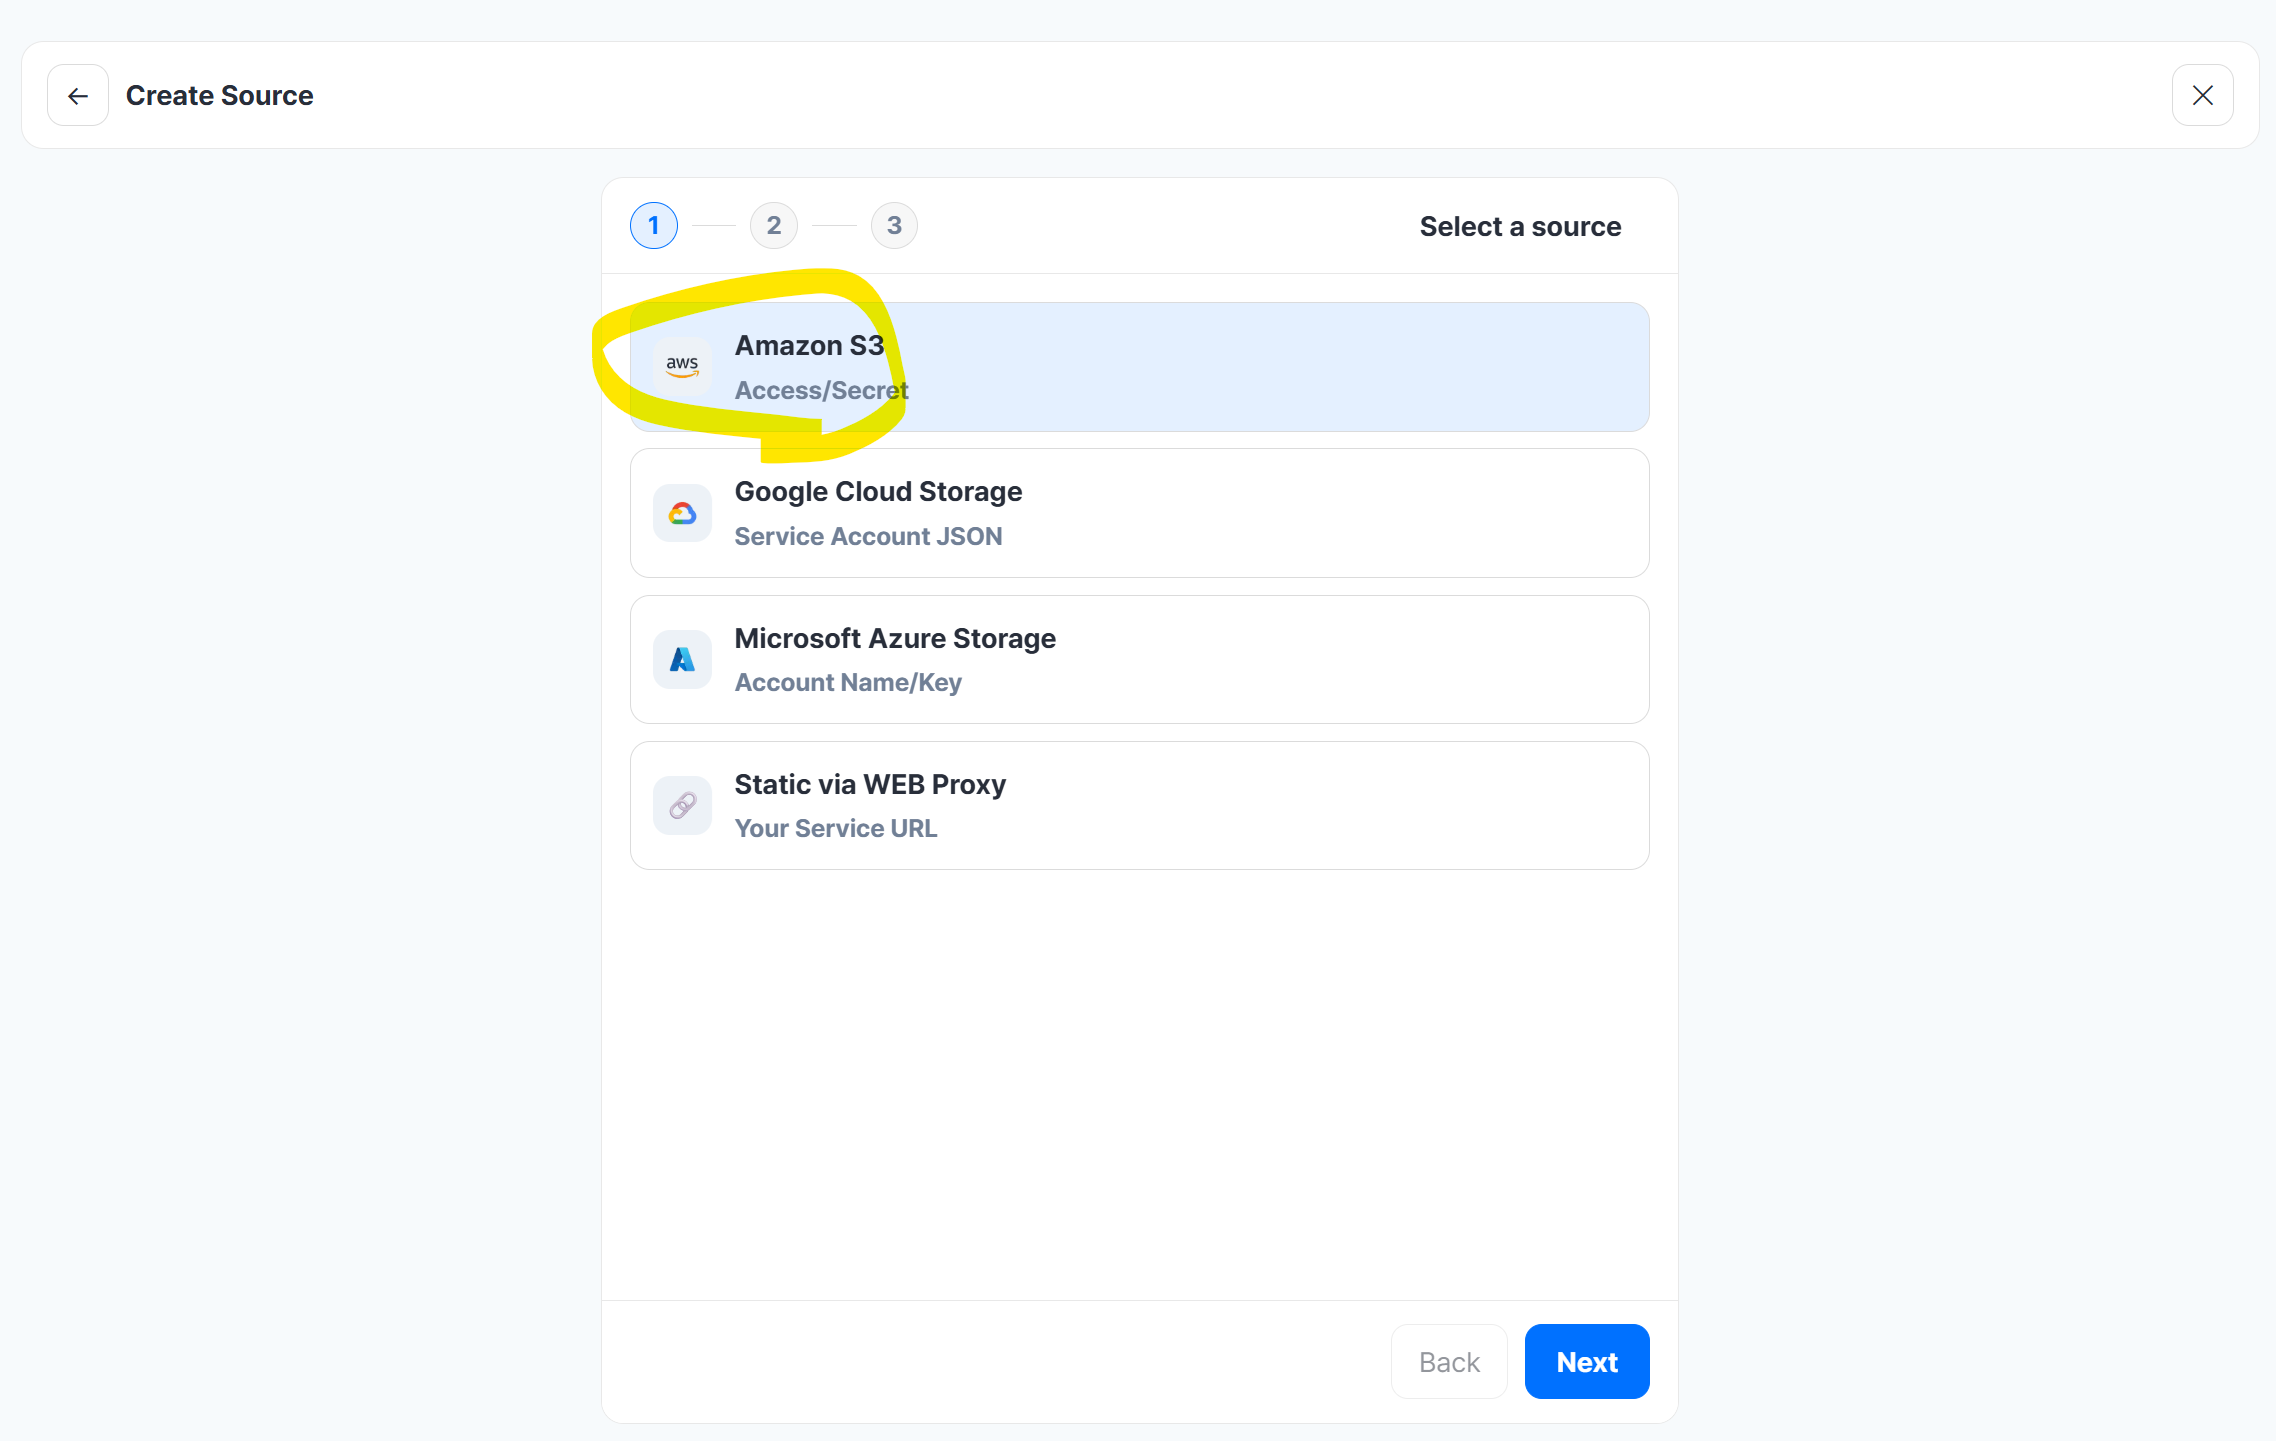
8. Go to **Sources ⟶ Add Source ⟶ Amazon S3**.
9. Enter the credentials you obtained above.

#### Below is the same guide shown in images.

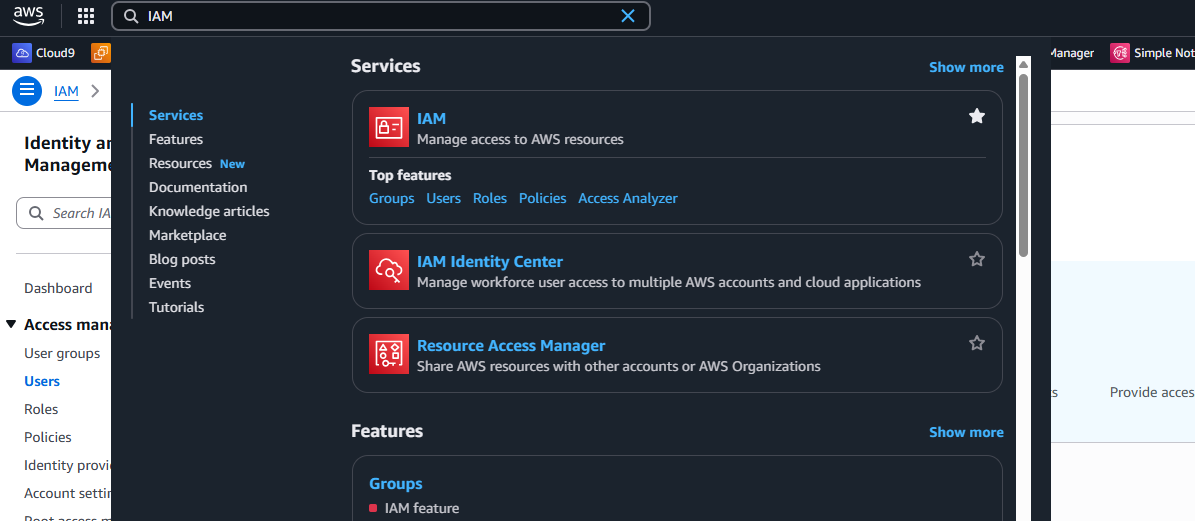
#### 1. In the AWS Management Console, search for **IAM**

<figure><img src="https://2148242329-files.gitbook.io/~/files/v0/b/gitbook-x-prod.appspot.com/o/spaces%2FxGV4or1Scr0ygVH4EZcP%2Fuploads%2Fh1fpIiBM3VnUISaLfh16%2F1.png?alt=media&#x26;token=791e71cb-2d75-4af2-acba-2766f82fc4b6" alt=""><figcaption></figcaption></figure>

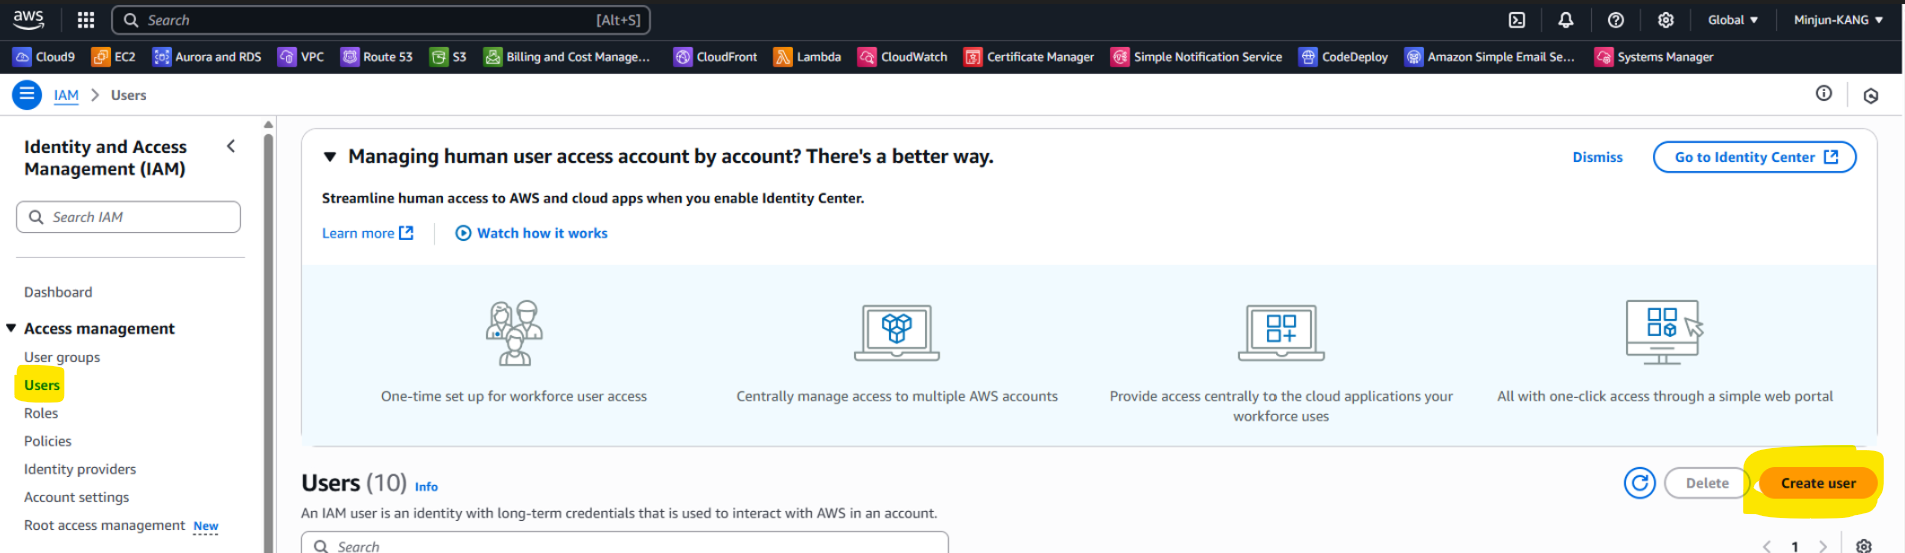
#### 2.  In the left navigation, click **Users**, then click **Create user**

1. Click **Users** in the left navigation
2. Click **Create user** (bottom-right)

<div data-full-width="true"><figure><img src="https://2148242329-files.gitbook.io/~/files/v0/b/gitbook-x-prod.appspot.com/o/spaces%2FxGV4or1Scr0ygVH4EZcP%2Fuploads%2Fo023zeLFdLzuo5qX5PX0%2Fimage.png?alt=media&#x26;token=b9cc7c98-78fe-42dc-9f51-3c0d8bb539b9" alt=""><figcaption></figcaption></figure></div>

#### 3. Enter a user name and click **Next**

1. Enter `weekerp-cdn-reader`
2. Click **Next**

<figure><img src="https://2148242329-files.gitbook.io/~/files/v0/b/gitbook-x-prod.appspot.com/o/spaces%2FxGV4or1Scr0ygVH4EZcP%2Fuploads%2FSGPqDt7HejdhZr5Pm7bi%2Fimage.png?alt=media&#x26;token=10c1185a-ea58-4eac-a325-4f518ce6e524" alt=""><figcaption></figcaption></figure>

#### 4. Attach a policy

1. Search for **AmazonS3ReadOnlyAccess**
2. Select it from the results
3. Click **Next**

<figure><img src="https://2148242329-files.gitbook.io/~/files/v0/b/gitbook-x-prod.appspot.com/o/spaces%2FxGV4or1Scr0ygVH4EZcP%2Fuploads%2F1DxNOSHiNCTk6lgwwm9k%2Fimage.png?alt=media&#x26;token=30cf4039-0c90-45f1-a1d5-843d4427c4f4" alt=""><figcaption></figcaption></figure>

> If you prefer attaching a custom policy directly, you’ll need permissions like the following:

```json
{
  "Statement": [
    {
      "Effect": "Allow",
      "Action": [
        "s3:GetObject",
        "s3:ListBucket",
        "s3:GetBucketLocation"
      ],
      "Resource": [
        "arn:aws:s3:::my-bucket/*",
        "arn:aws:s3:::my-bucket"
      ]
    }
  ]
}
```

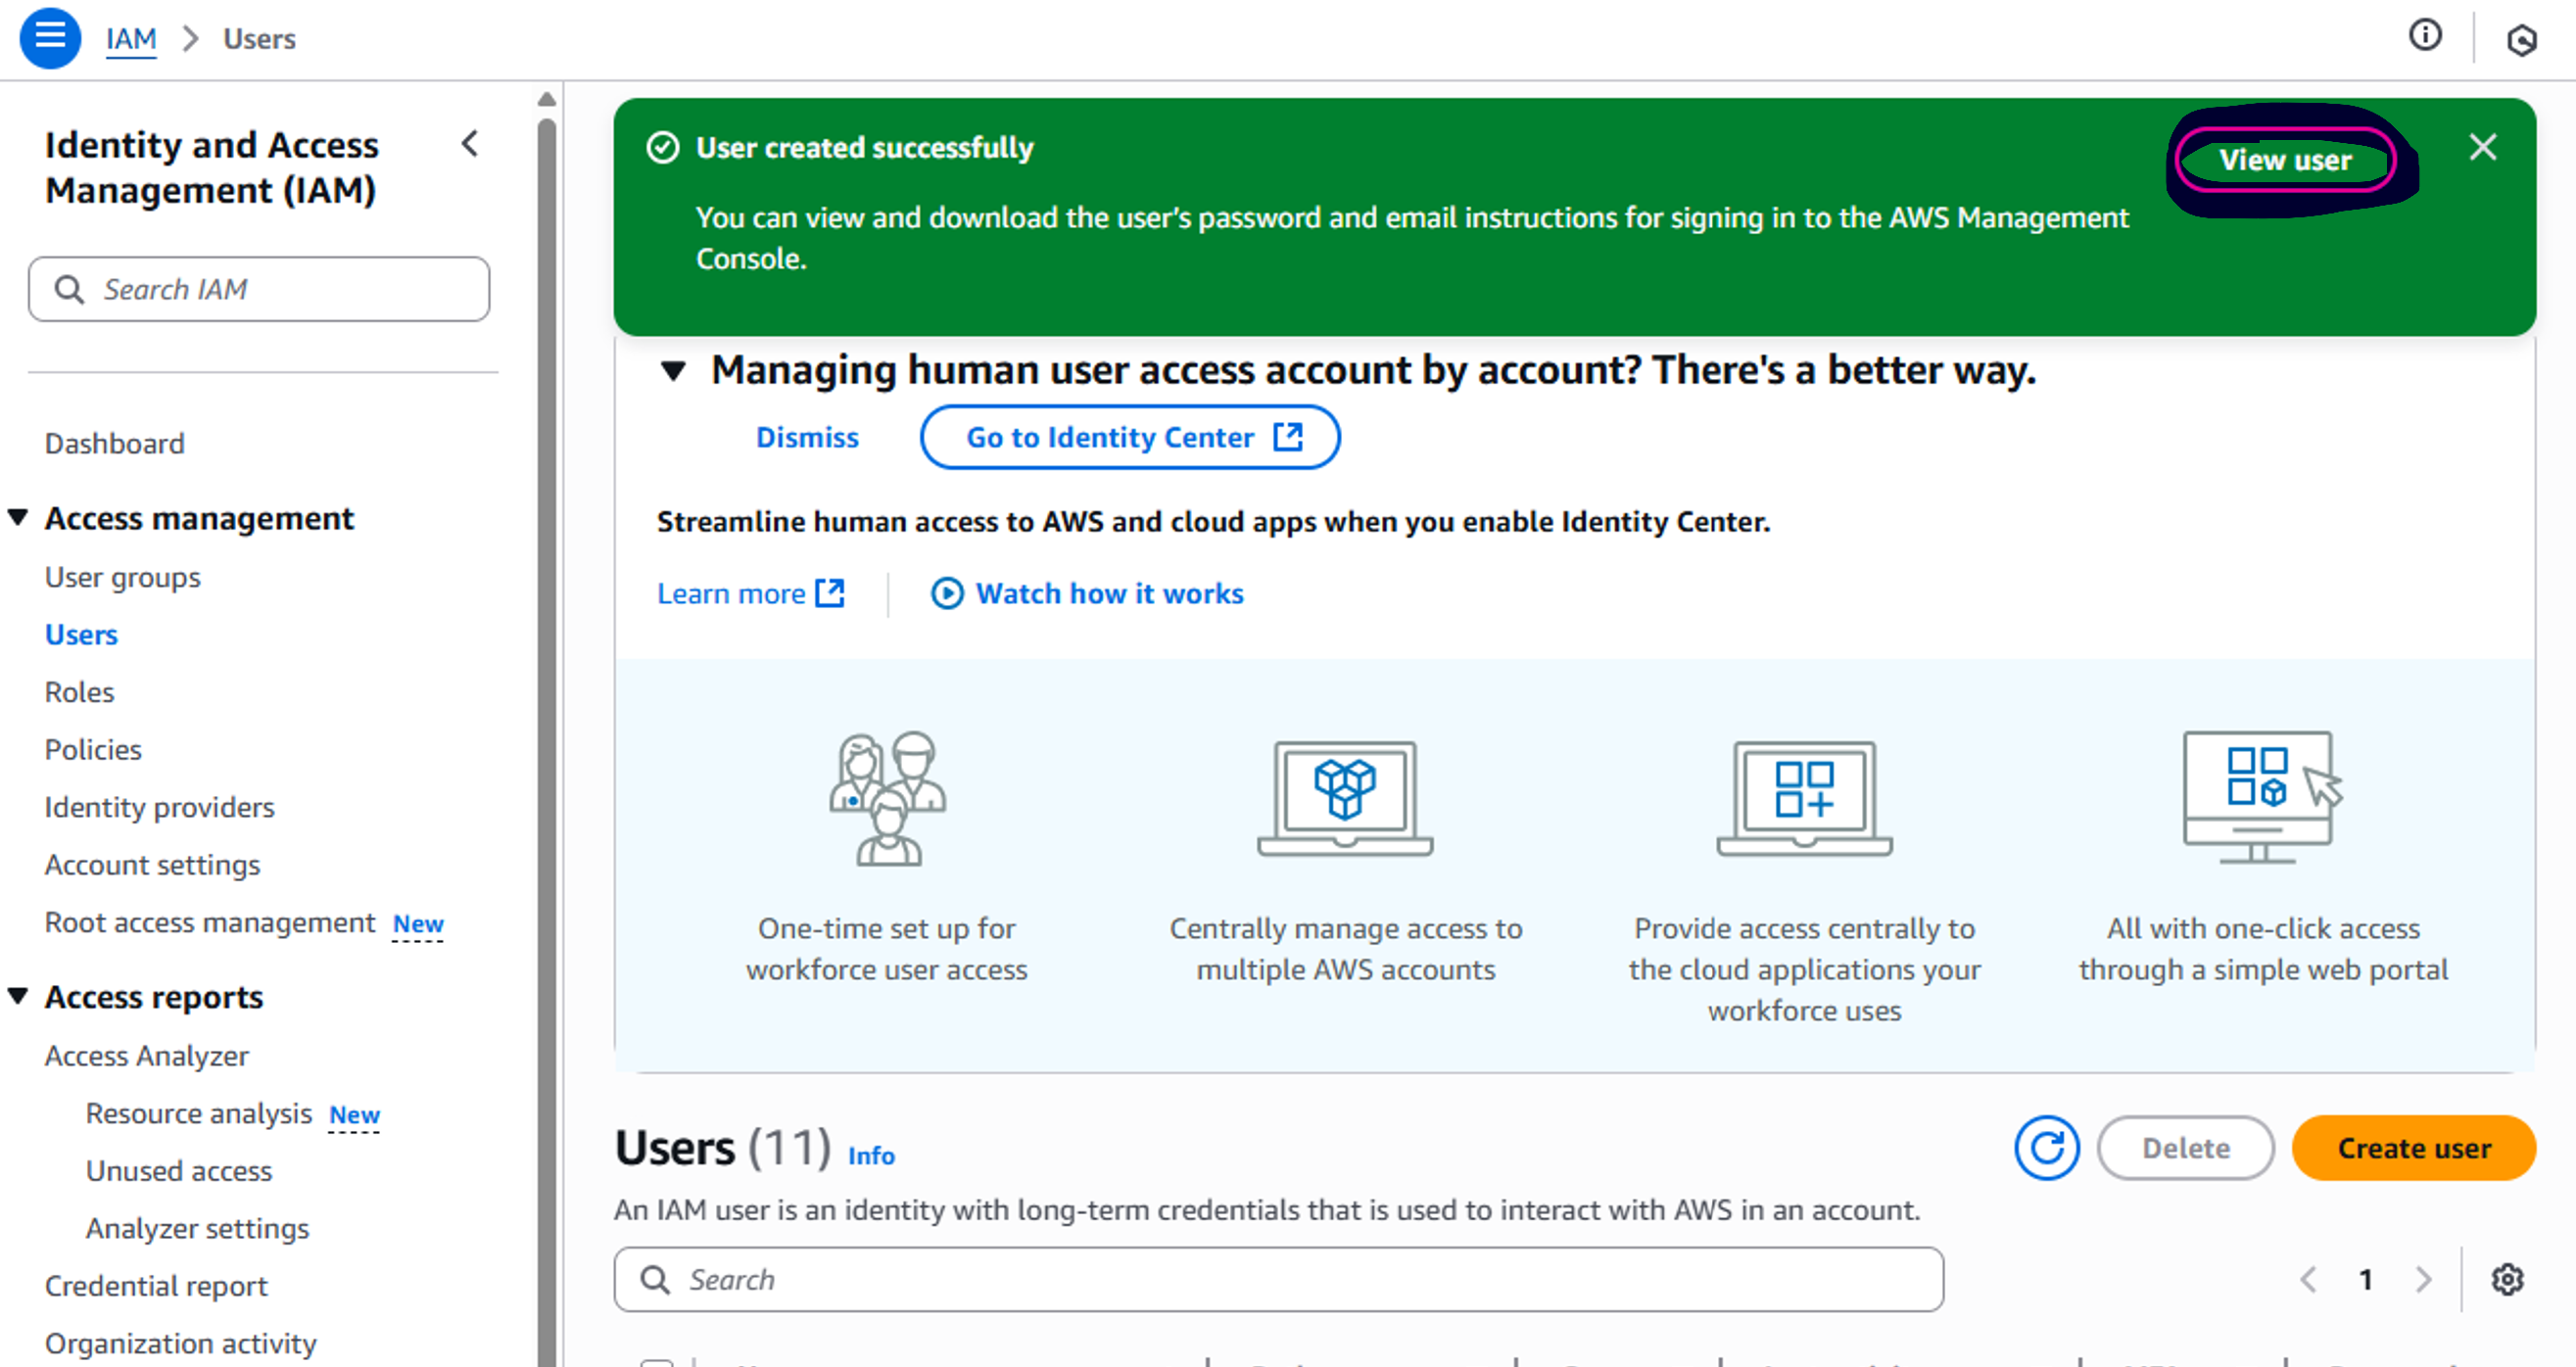
#### 5. Verify the creation result

1. Confirm the created user
2. Click **View user**

<figure><img src="https://2148242329-files.gitbook.io/~/files/v0/b/gitbook-x-prod.appspot.com/o/spaces%2FxGV4or1Scr0ygVH4EZcP%2Fuploads%2FWj64skMBrWOiIS5Be79F%2Fimage.png?alt=media&#x26;token=06ff0d21-75f2-4368-9450-a65b1d0984e1" alt=""><figcaption></figcaption></figure>

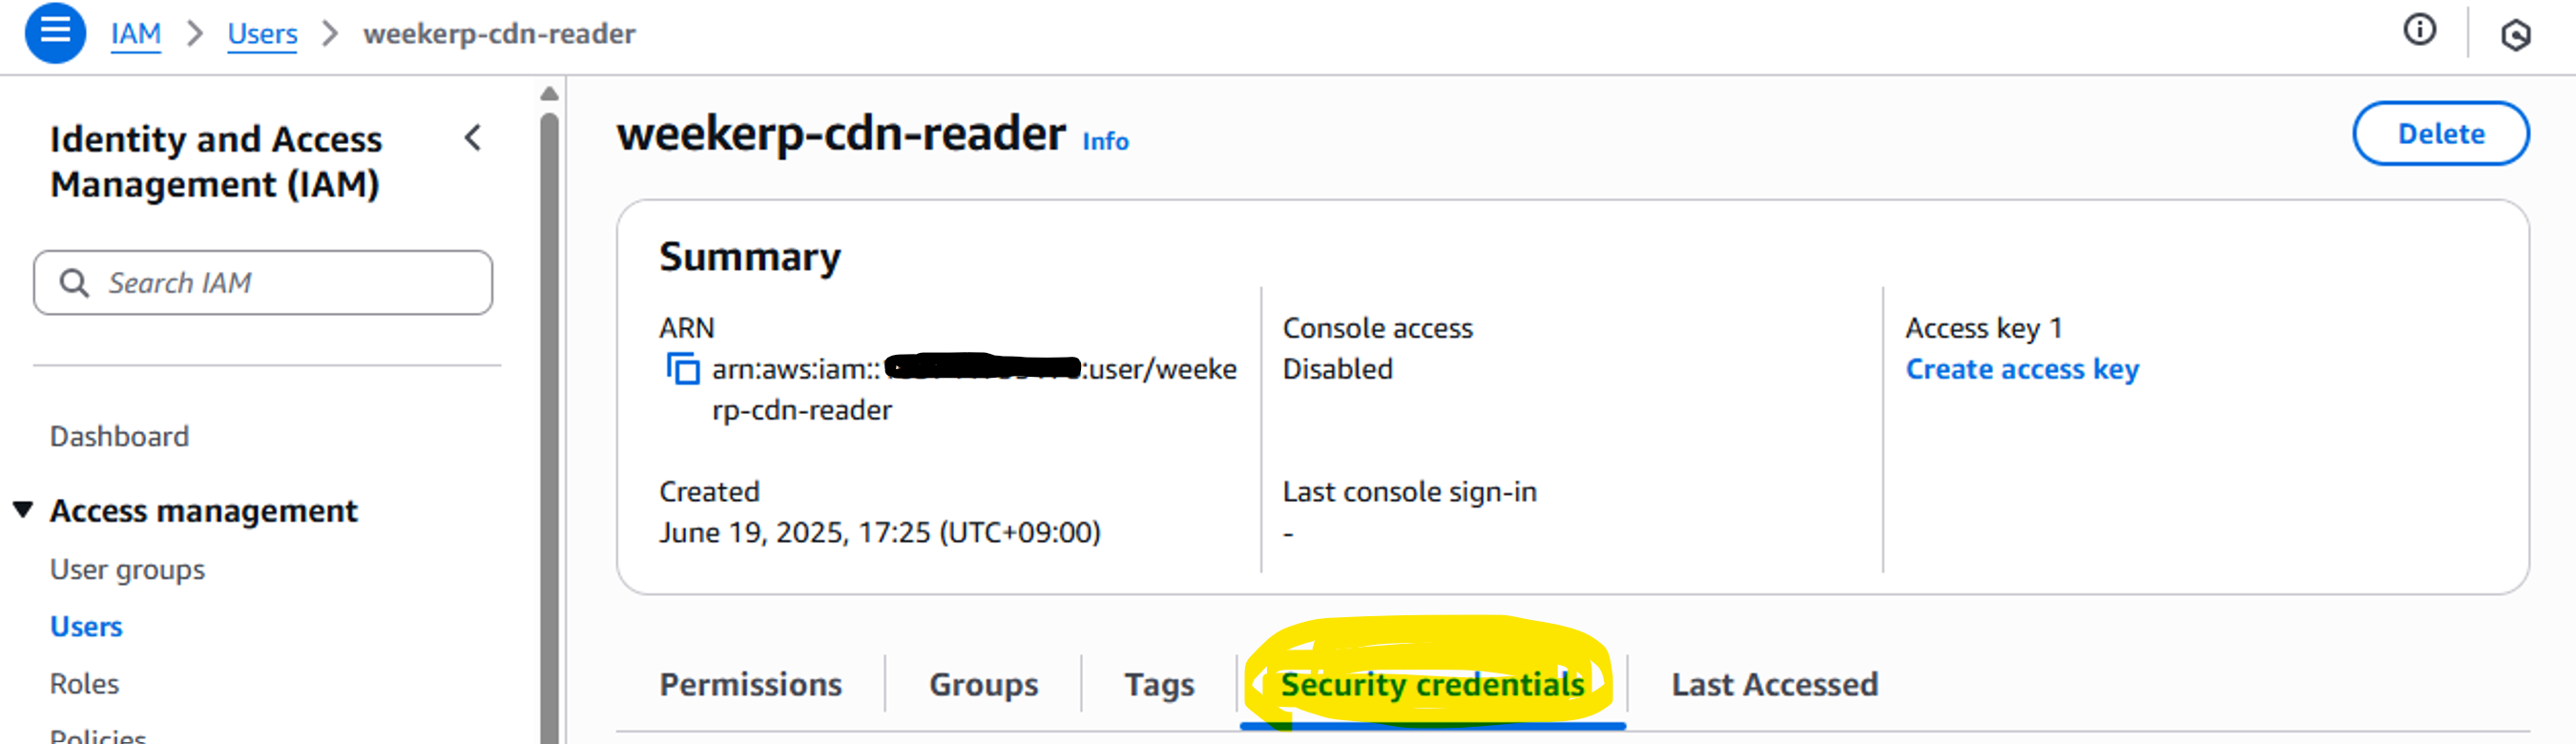
#### 6. On the user details page, open the **Security credentials** tab

<figure><img src="https://2148242329-files.gitbook.io/~/files/v0/b/gitbook-x-prod.appspot.com/o/spaces%2FxGV4or1Scr0ygVH4EZcP%2Fuploads%2Fe191Cg7OhKha7CCvXLIl%2Fimage.png?alt=media&#x26;token=4f2114e0-9847-42f0-89e7-6eb976666102" alt=""><figcaption></figcaption></figure>

ㅡ

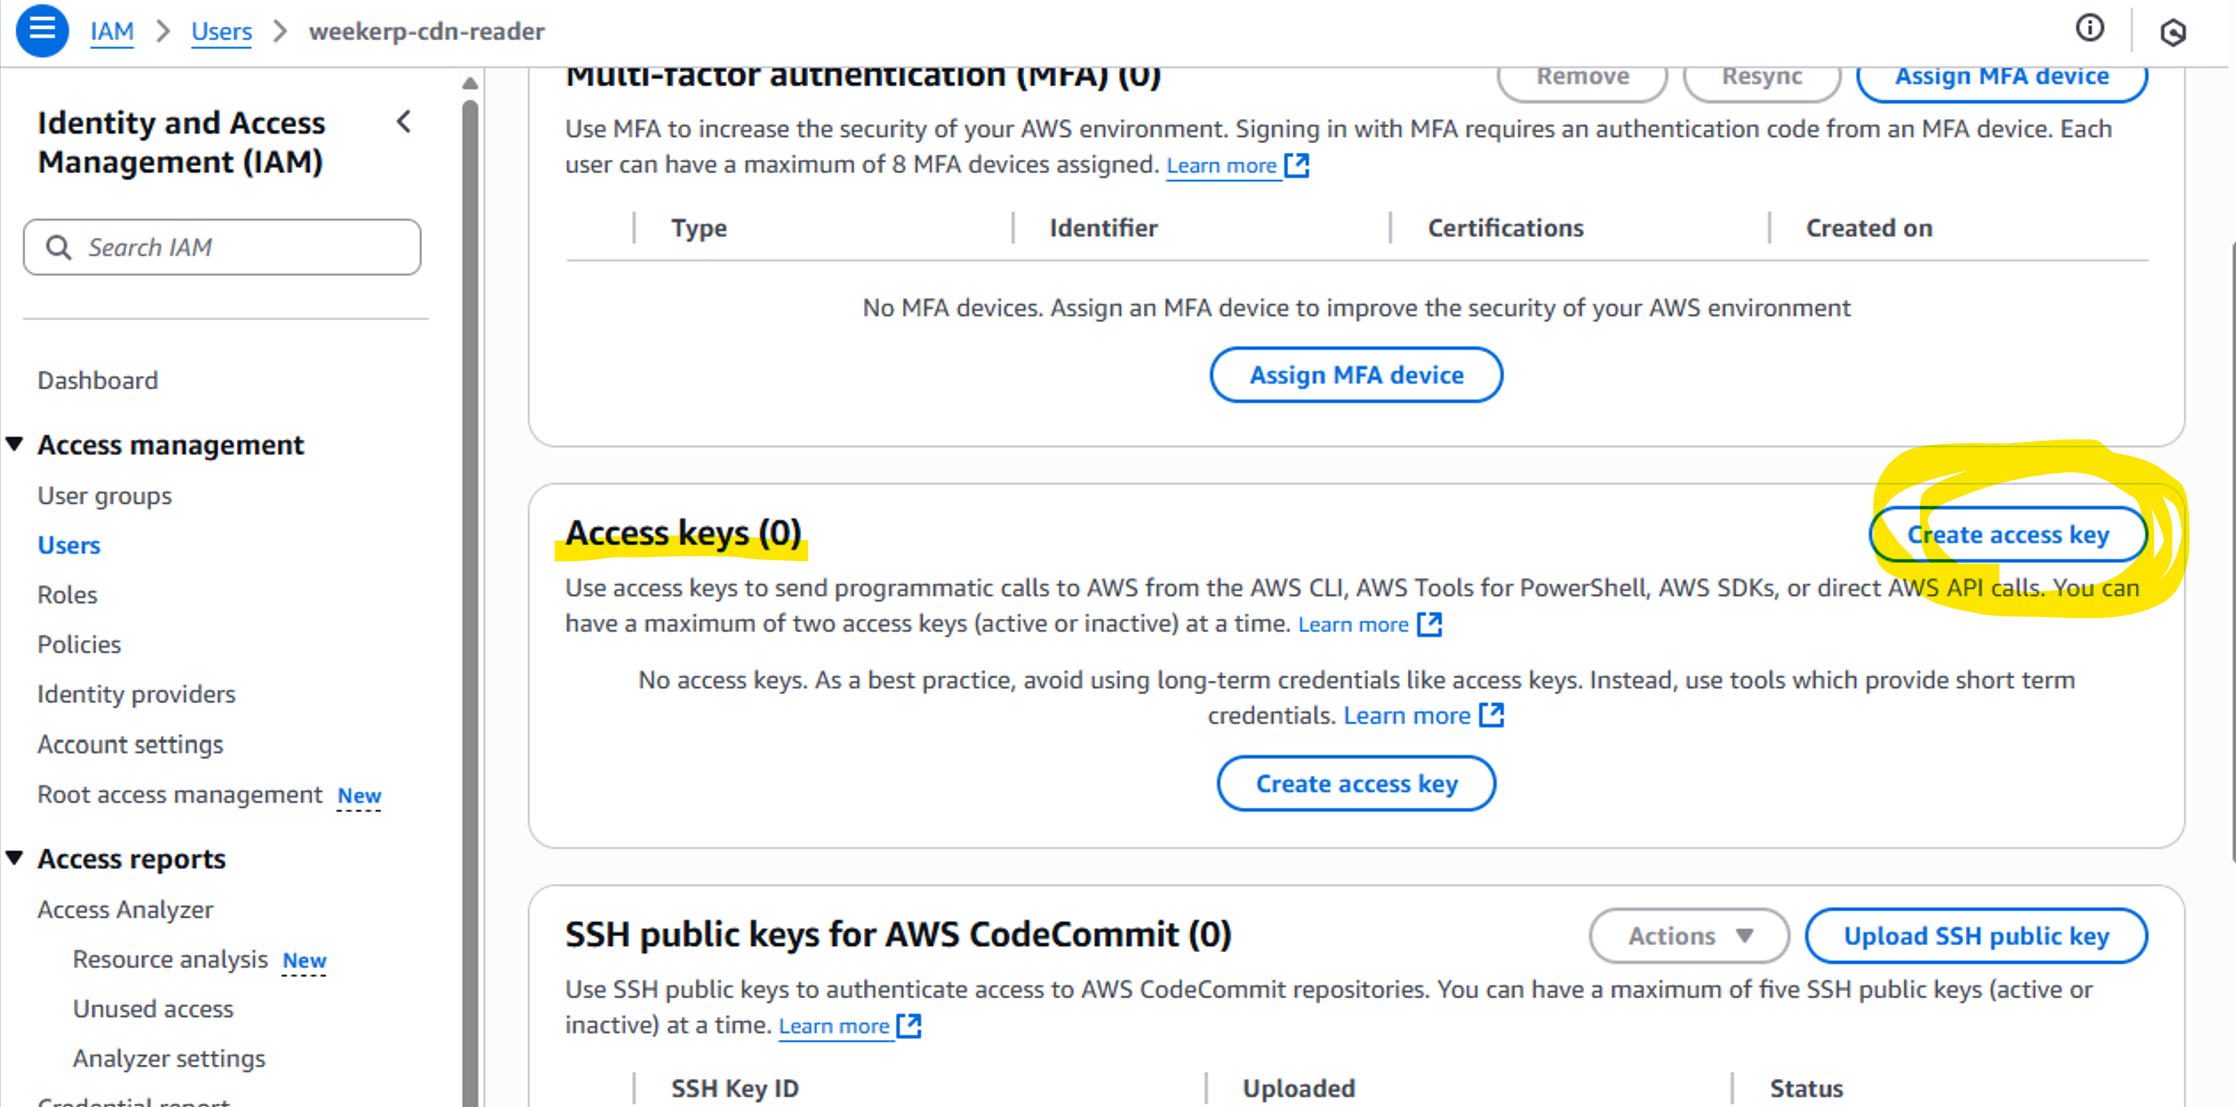
#### 7.  Scroll down and click **Create access key**

1. Scroll down
2. Click **Create access key**

<figure><img src="https://2148242329-files.gitbook.io/~/files/v0/b/gitbook-x-prod.appspot.com/o/spaces%2FxGV4or1Scr0ygVH4EZcP%2Fuploads%2F6GhGDNh6sb8eVx5Qm1xW%2Fimage.png?alt=media&#x26;token=f94c3e5e-81f8-44aa-867d-c090ed32a33a" alt=""><figcaption></figcaption></figure>

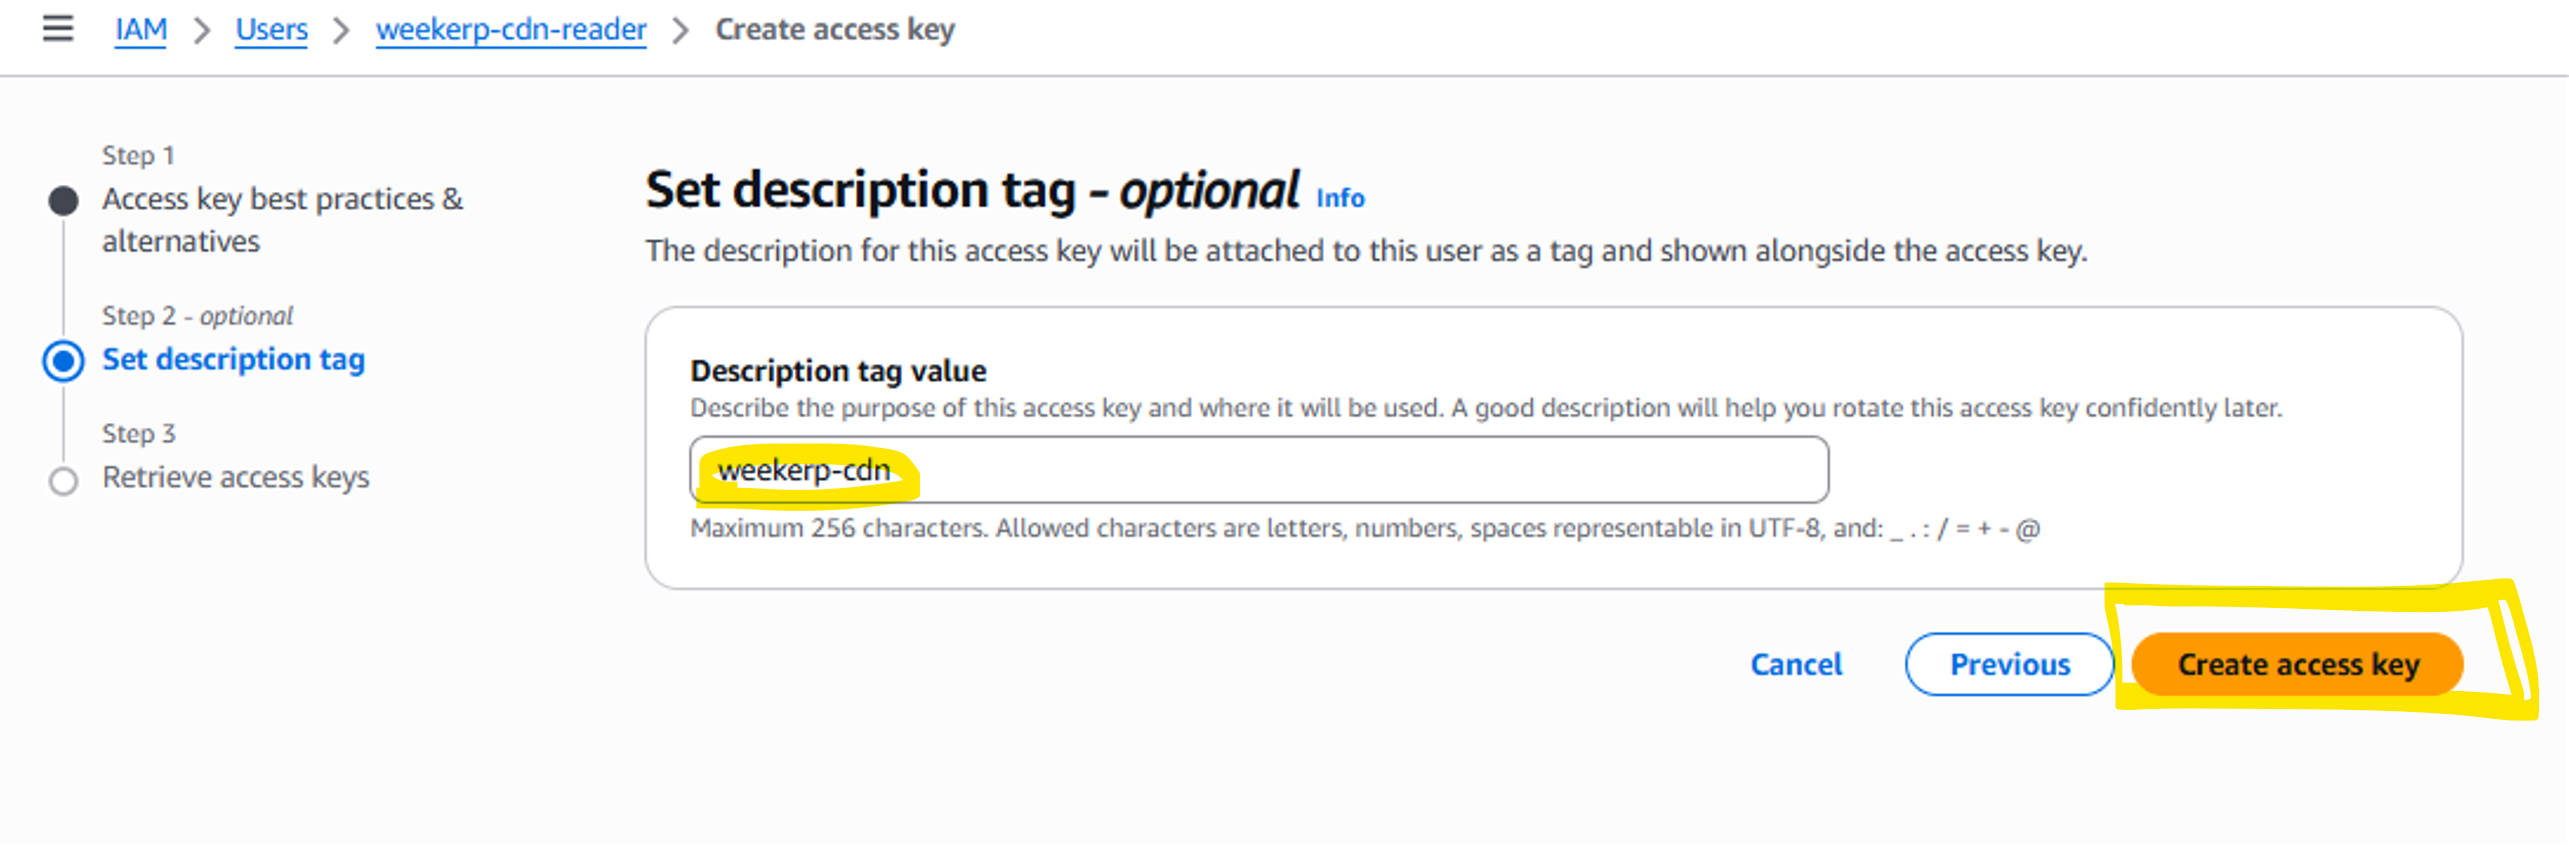
#### 8. Add a description and create the key

1. Enter a **Description tag value**
2. Click **Create access key**

<figure><img src="https://2148242329-files.gitbook.io/~/files/v0/b/gitbook-x-prod.appspot.com/o/spaces%2FxGV4or1Scr0ygVH4EZcP%2Fuploads%2F8IXPjtGUhIgLSrtZM5Vl%2Fimage.png?alt=media&#x26;token=0515f6dc-0332-4f5c-9cad-00ef92fadbe7" alt=""><figcaption></figcaption></figure>

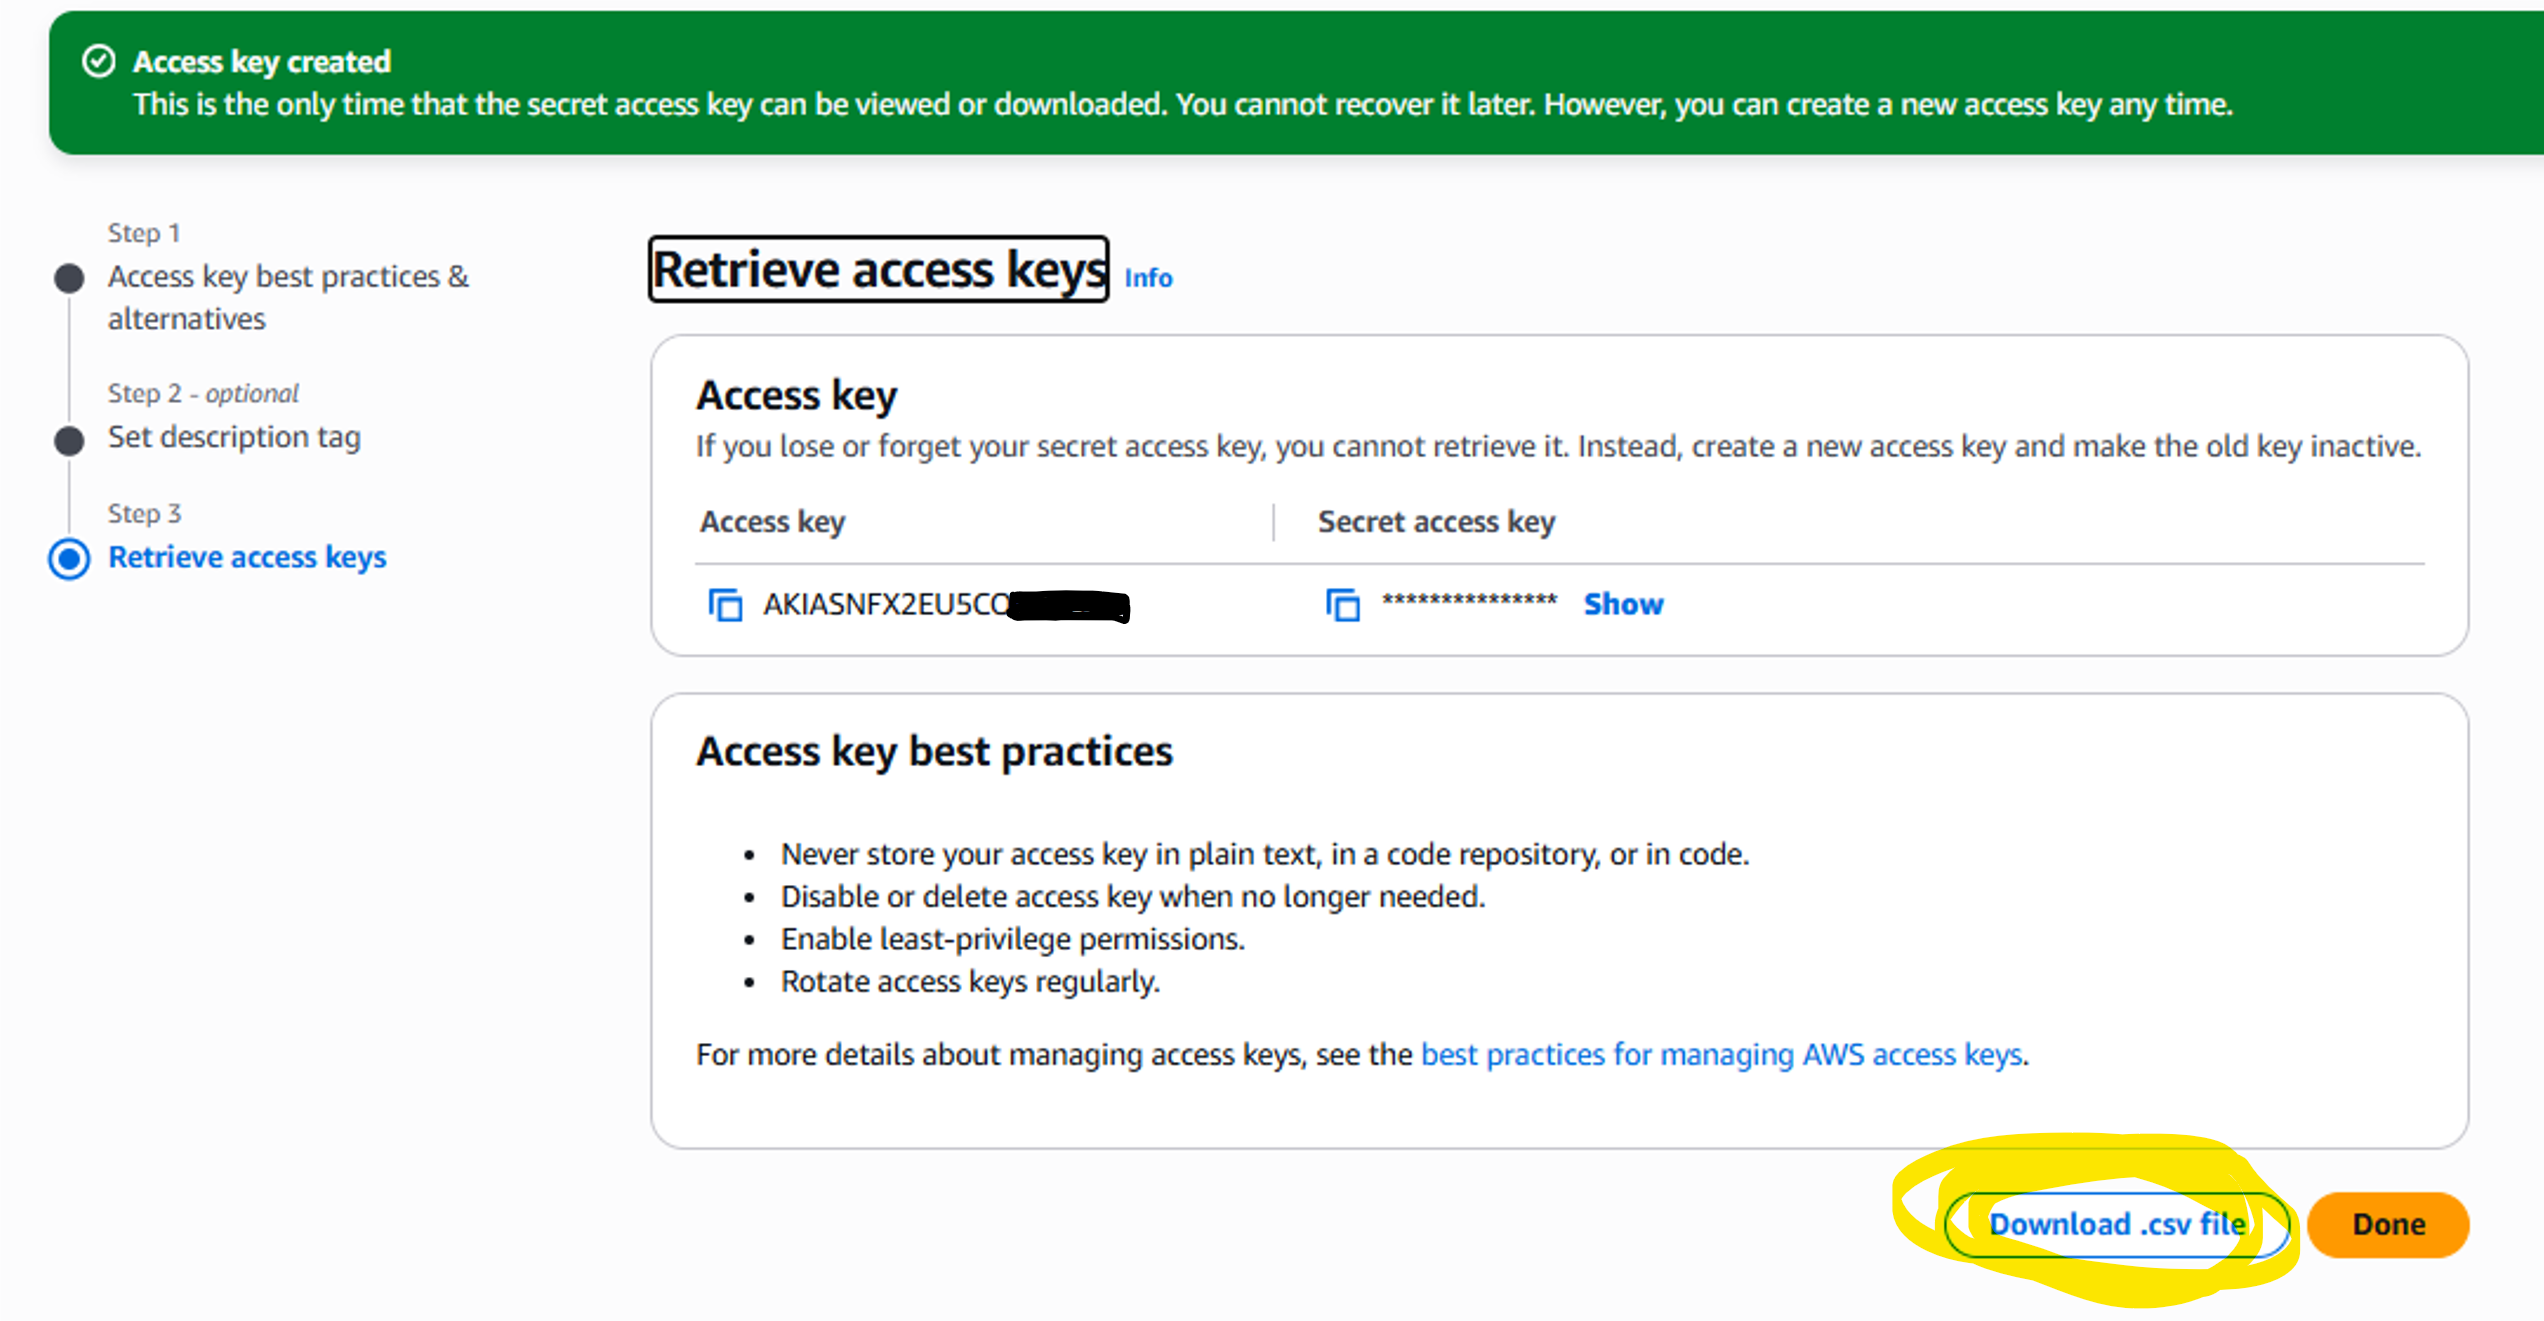
#### 9. Confirm the result and download the CSV file

1. Verify the keys
2. (Recommended) Download the **CSV file**

<figure><img src="https://2148242329-files.gitbook.io/~/files/v0/b/gitbook-x-prod.appspot.com/o/spaces%2FxGV4or1Scr0ygVH4EZcP%2Fuploads%2Fp7I5wMqLLOTCyKme0zWs%2Fimage.png?alt=media&#x26;token=92b0a90e-b002-41b0-bc7d-c381c5bb2f4f" alt=""><figcaption></figcaption></figure>

&#x20;

#### 10. Make sure you have the following ready:

1. Bucket Region (Step #1)
2. Access Key ID (Step #9)
3. Secret Access Key (Step #9)
4. Bucket Name (Step #4)

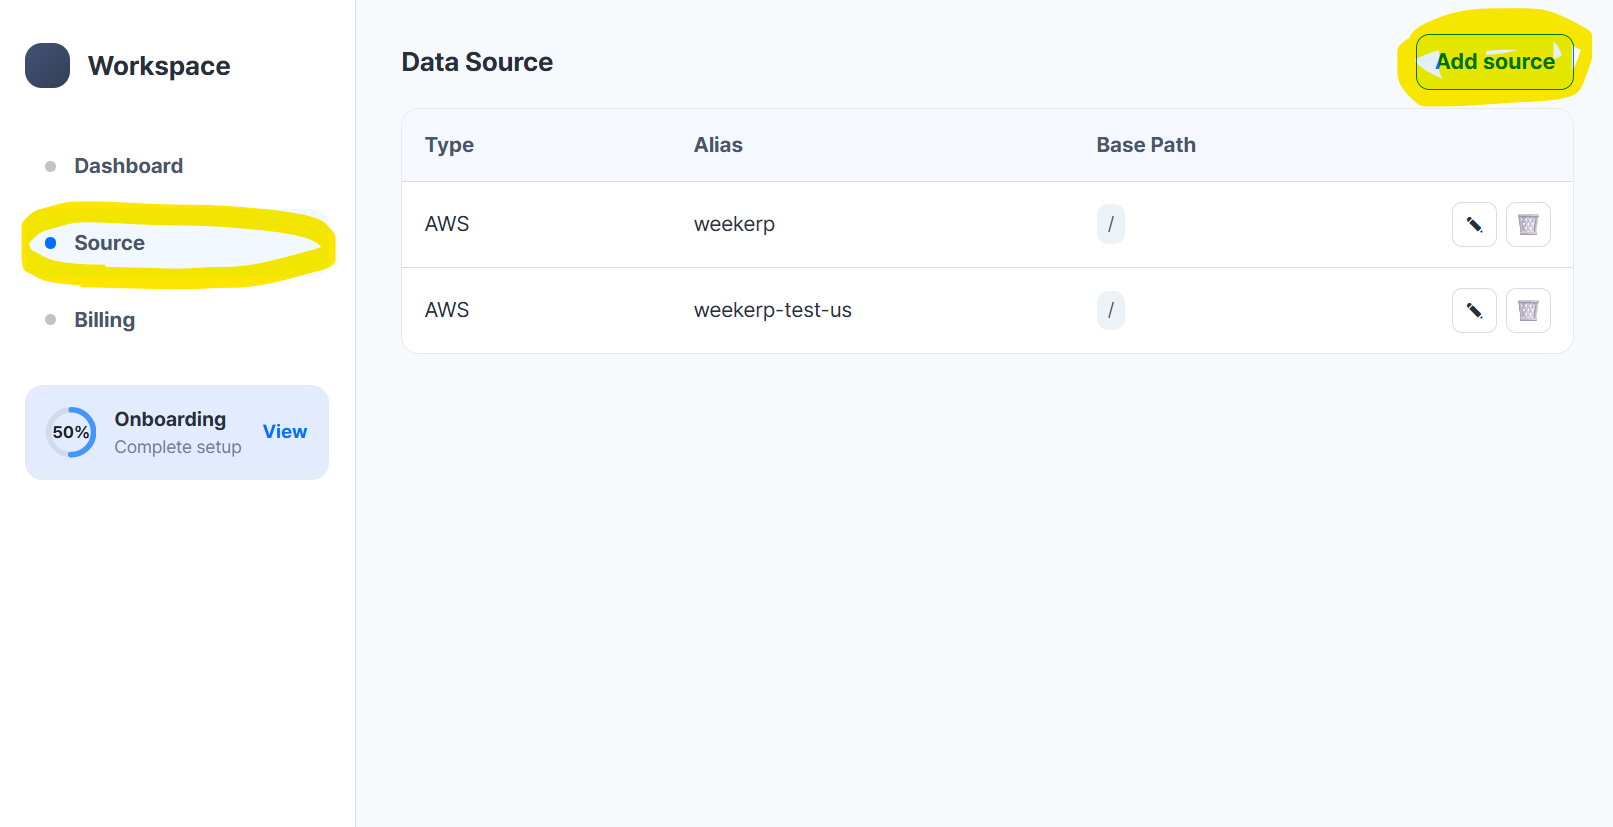
#### 11. In Weekerp, click **Add Source** (top-right)

1. [Open Weekerp](https://weekerp.com/space/callback)
2. Click the **Source** tab
3. Click **Add Source**

<figure><img src="https://2148242329-files.gitbook.io/~/files/v0/b/gitbook-x-prod.appspot.com/o/spaces%2FxGV4or1Scr0ygVH4EZcP%2Fuploads%2Ffoe5lGSSLWZZQBgFMO0B%2Fimage.png?alt=media&#x26;token=1440b9a8-505c-4f49-87ec-b09b6e6aa6eb" alt=""><figcaption></figcaption></figure>

#### 12. Select **Amazon S3**

<figure><img src="https://2148242329-files.gitbook.io/~/files/v0/b/gitbook-x-prod.appspot.com/o/spaces%2FxGV4or1Scr0ygVH4EZcP%2Fuploads%2Fx9Ba5Hx8v4rfzFHAhVB5%2F1.png?alt=media&#x26;token=b90fc68f-d131-459f-8a94-cba57cdd699f" alt=""><figcaption></figcaption></figure>

#### 13. Enter credential information

1. Select **Region**
2. Enter **Access Key ID**
3. Enter **Secret Access Key**
4. Enter **Bucket Name**

<figure><img src="https://2148242329-files.gitbook.io/~/files/v0/b/gitbook-x-prod.appspot.com/o/spaces%2FxGV4or1Scr0ygVH4EZcP%2Fuploads%2FYAY0n0CbkaK6IkS1mBxa%2F2.png?alt=media&#x26;token=81f39982-eb19-4bc4-9dba-d94e6eead948" alt=""><figcaption></figcaption></figure>

{% hint style="info" %}
**BasePath** sets the root directory for origin requests.
{% endhint %}

If your files are stored like below, you can set BasePath to `/` or `/assets`.

* /dog.jpg
* /assets/cat.png

**Request example**

* `cdn.weekerp.com/image/{alias}/dog.jpg`

**Origin request**

* **With BasePath set:** <https://static.example.com/**`assets`**/dog.jpg>
* **Without BasePath:** <https://static.example.com/dog.jpg>

For more details, please refer to [basepath](https://weekerp.gitbook.io/image/storage/basepath "mention").

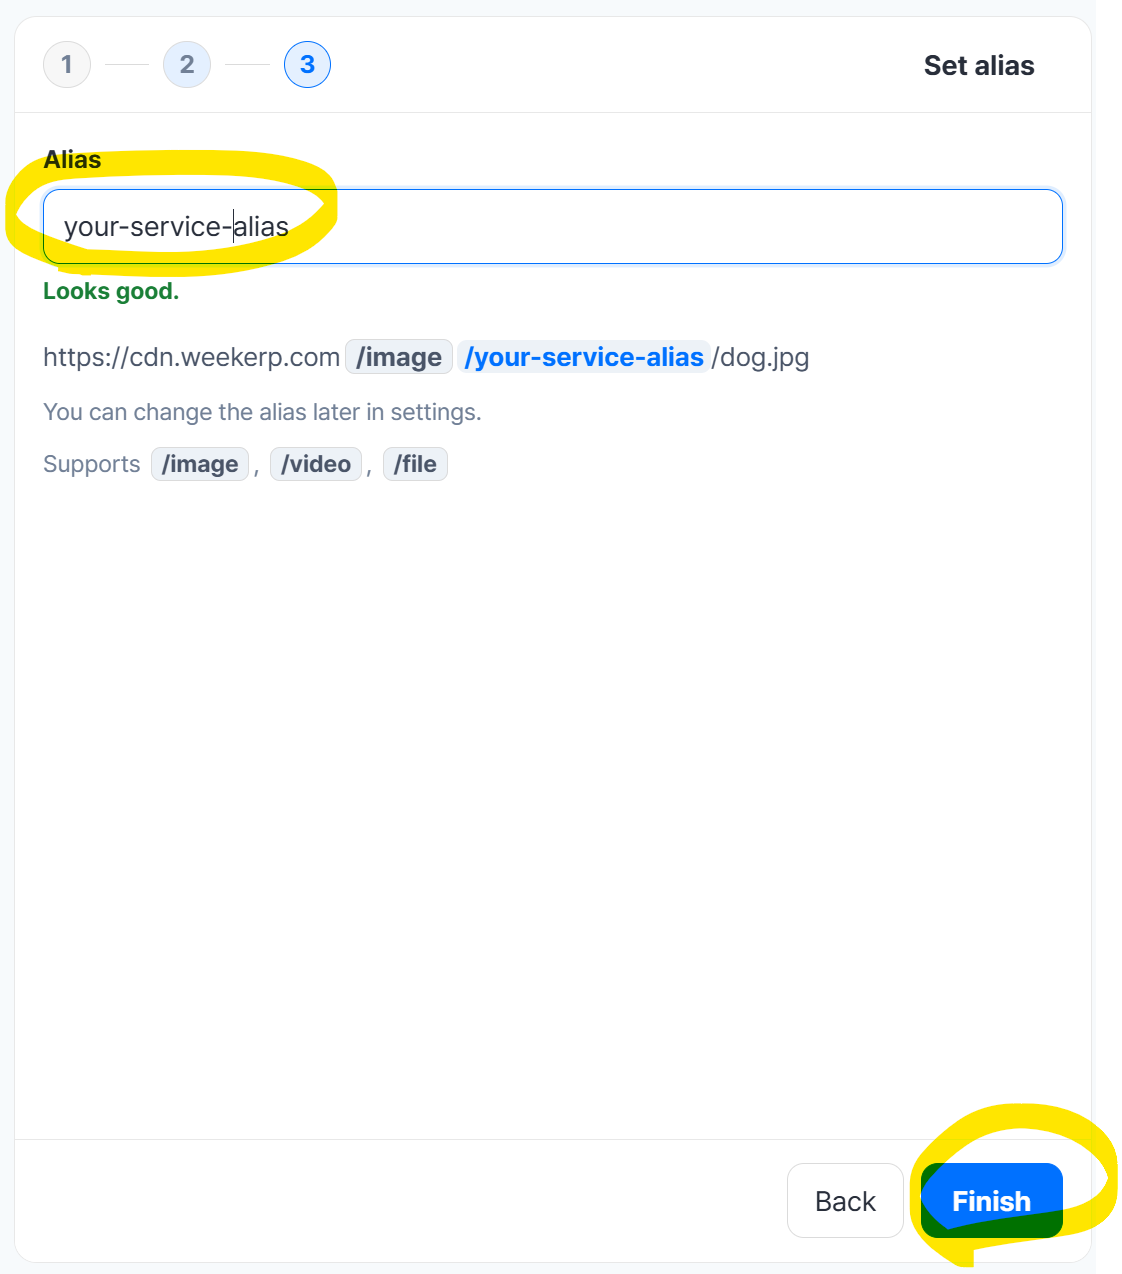
#### 14. Enter the source alias

1. Enter the alias you want to use
2. Create the alias

<figure><img src="https://2148242329-files.gitbook.io/~/files/v0/b/gitbook-x-prod.appspot.com/o/spaces%2FxGV4or1Scr0ygVH4EZcP%2Fuploads%2FxFChFmxQG2TuneZICyt0%2F3.png?alt=media&#x26;token=eee81971-a442-469d-9527-97025a032700" alt=""><figcaption></figcaption></figure>

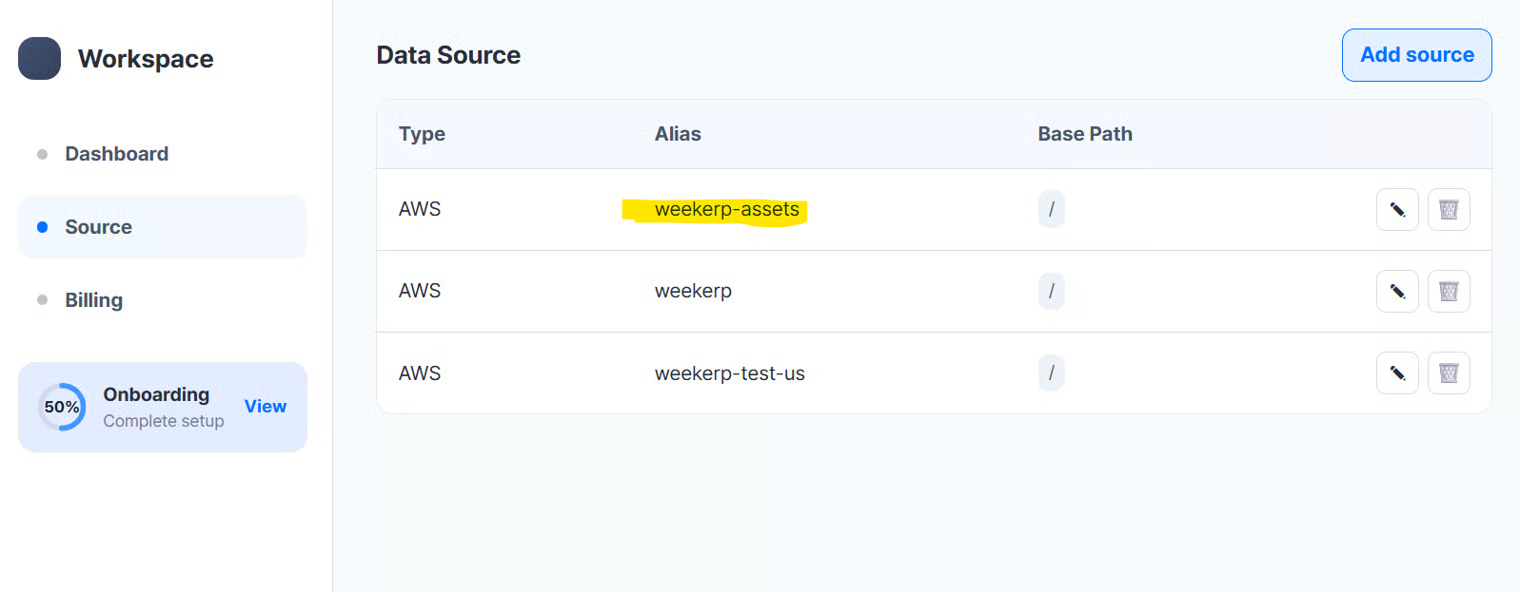
#### 15. Verify the created data source

<figure><img src="https://2148242329-files.gitbook.io/~/files/v0/b/gitbook-x-prod.appspot.com/o/spaces%2FxGV4or1Scr0ygVH4EZcP%2Fuploads%2FghN2k0RX7ZqEhz2jGYxi%2F4.png?alt=media&#x26;token=8b3daded-0324-4115-b1cf-e18eed246027" alt=""><figcaption></figcaption></figure>

#### Use it like this:

cdn.weekerp.com/<mark style="color:red;">`image`</mark>/`weekerp-assets`/dog.jpg

cdn.weekerp.com/<mark style="color:red;">`image`</mark>/`weekerp-assets`/dog.jpg?ai=Rotate the image to the right

cdn.weekerp.com/<mark style="color:red;">`video`</mark>/`weekerp-assets`/test-video.mp4

All settings are complete.

In general, it takes about **5–10 minutes** to propagate the connection across all global environments.
